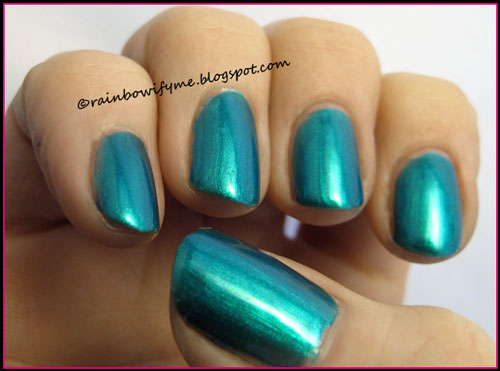
Tuesday, April 30, 2013

Orly ~ Rock Solid - with Flormar holo stripe


Orly ~ Rock Solid
Gunmetal grey with shimmer and bits of holo glitter

Rock Solid is from the Mineral FX Collection from autumn 2011. The more polishes I try from this collection, the more I want them all. I didn’t buy this one to begin with, but found it in a blog sale recently, brand new and never used. I am not sure I understand why, but never mind - it’s mine now, all mine muahaha!! :D

The formula is nice. When I applied the first coat it looked as if it was going to take three coats to make it look nice, but two layers did the job. The holo glitters doesn’t “drown” in the grey polish, and that means that it dries up a little bit gritty. I don’t mind at all.

Here’s what it looks like without top coat:


And from a different angle:


Then I decided to pimp it up a bit. I used a holo glitter from Flormar with the number 392, and freehanded a line down the middle of each nail. The Flormar is a really dense glitter, so one thick stripe worked fine. When it had dried, I framed the holo glitter with a dark red stripe on each side. I used a striper from NYX Ink called Deep Red.


I finished off my mani with a layer of Catrice Quick Dry & High Shine top coat, and here’s how it ended up looking:


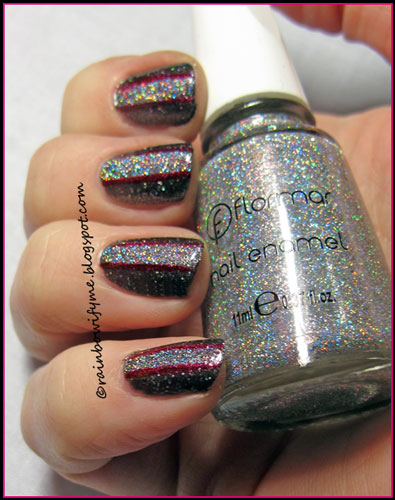
Isn’t that glitter just beautiful?!


Here are the three polishes I used for this mani:


Allow me to be proud of myself for doing this mani without using tape!


Opacity: 7/10
Colour, prettiness: 8/10
Durability: 8/10
Value for money: 7/10
Overall: 7.5/10
Buy again: Yes

Monday, April 29, 2013

China Glaze ~ Glistening Snow - with double stamp


China Glaze ~ Glistening Snow
Holographic silver glitter

Glistening Snow is from China Glaze’s Holiday Joy collection from 2012. I figured that the holo silver would make a nice base colour for something I’ve been wanting to do for quite a while: Double stamping.

The formula is great. The glitter spreads out evenly and easily, and it dries really fast. It only took two coats to make it opaque, and if you’re the kind of girl who likes a discreet glittery mani, I suggest to apply just one layer of this polish.

I had no sun available (grrr!), but here’s a pic under a light bulb:


There’s no top coat on yet. I am sure this’ll go crazy in sparkles and glitters in the sunshine. I’ll definitely use it in the summer too!

Now for the double stamping. I started out with a red all nail design from Cheeky, namely CH10. I stamped with Sally Hansen Insta-Dri “Racey Rouge”, a bright red crème polish.

I forgot to take pictures of this step :/

Then I stamped again, using stamping plate BM07 from Bundlemonster. I stamped my black peace sign on with a black no name stamping polish. After I had stamped on all my nails I sealed my design up with a layer of Poshé top coat, and here’s what it ended up looking like – the pic is taken under a light bulb:


And here’s a picture taken in the light box. The flat light there makes it possible for you to see the all nail stamp better!


And here are two polish sisters that love each other :D


I’m not completely satisfied with this, and I can’t put my finger on what’s wrong with it. I’m definitely doing the double stamping again though!

Have you tried double stamping? If yes, were you satisfied with it?

Opacity: 8/10
Colour, prettiness: 8/10
Durability: 8/10
Value for money: 8/10
Overall: 8/10
Buy again: Yes

Sunday, April 28, 2013

Golden Rose Matte Velvet ~ 101 with stripes


Golden Rose Matte Velvet ~ 101
Baby blue with shimmer and a silky finish

with

Orly ~ Stone Cold
Blue jelly base with blue flaky glitter

This Golden Rose polish was a surprise Christmas gift from my sweet friend Aylin from Posh Nail Art. It’s totally cool to have friends like her!

The formula is good, and the polish glides on easily. This one is not a one coater like its sisters – it takes two easy coats to get a smooth and opaque surface.

This is two coats, no top coat:


Isn’t this just pretty?

Then I put three peaces of striping tape on each nail, and painted over it with Orly’s Stone Cold. It’s from their Mineral FX collection from autumn 2011, a series I have come to like more and more as I get my hands on them. I applied one relatively thick layer of Stone Cold, and removed the stripes of tape right after. I sealed it up with a layer of Catrice Quick Dry & High Shine top coat. 

Even though this mani looked really cool in real life, I must admit that I was really sad over how badly it photographed. There’s only going to be one picture out of the bunch, the rest was even worse! :D Here goes:


The blue couple:


I can assure you that it looked really nice in real life, and it was totally worth the effort with the striping tape! :)

Saturday, April 27, 2013

Pretty & Polished ~ Sand Art


Pretty & Polished ~ Sand Art  
Clear base packed with matte blue, green, pink and purple glitter


I have had this Pretty & Polished glitter in my stash for a while, trying to figure out some clever mani to use it for. I decided to go for something familiar: A glitter gradient.

The underwear for this gradient is Sally Hansen “Calypso Blue”, a pretty, shimmery turquoise, which is opaque in two easy coats. Drying time is average on this one. Here’s first a picture taken in my light box: Two coats, no top coat:


The light is flat, and even though it’s obvious that the polish has a really nice shine, it doesn’t at all show what potential this baby has got. Let me show you what it looks like in the sunshine instead: 


See that polish come to life? I love it!

I wish I had been more creative with my Sand Art, but my mind went blank. I sponged the glitter onto the tips of three fingers, and reversed it on the last two fingers.

The glitter dries up really gritty. I applied two layers of Catrice Quick Dry & High Shine topcoat, but that didn’t make any difference when it comes to grittiness. Fortunately I don’t mind so much about that.

Picture taken in the light box:


Picture taken in the sun:


If you look at the thumb, you can really see the depth of the shimmer.

Here are the two polishes in crime:


I’m pleased with this, even though it’s not my most creative mani. But they can’t all be equally creative, can they? I need to make up a challenge soon, to get my creativity running again!

Tell me what you would have done with this polish, please! :)

Opacity: -/10
Colour, prettiness: 6/10
Durability: 7/10
Value for money: 6/10
Overall: 6/10
Buy again: No

Friday, April 26, 2013

Zoya ~ Aurora - with dots


Zoya ~ Aurora
Purple base packed with holographic glitter

Aurora is from Zoya’s holiday 2012 Ornate Collection, and is the prettiest one from that group in my opinion.

I really like Zoya’s polishes. The formula is great, and Aurora is opaque in two easy coats. Drying time is good and the holo effect is nicely visible, even in low lights.

Here’s a picture of two coats, no top coat. The picture is taken in my lightbox:


I was lucky to see the sun; I just made it before it went behind a cloud. This picture is taken in sunny conditions, but not in direct sunlight:


Then I made dots on it. I started out with making a bunch of black dots on one half of my nails. I used Essence “Black is Back” for that step. After that I made white dots. I made sure that the white dots covered most of the black dots. I used Models Own “Snow White” for that step.

I sealed it all up with Catrice Quick Dry & High Shine top coat. Apparently I was too fast – I don’t think the white polish was quite dry enough. The top coat pulled a bit on my design, O my lord how I hate it when that happens!

This first pic is taken in my light box. The camera freaked out colourwise for some reason I don’t quite understand:


And here’s an outdoor pic – again not in direct sunlight, but close:


Here are the three polishes, I used:


 love dotticures! They’re easy to make and usually look fantastic with little effort only. I like that fact.

What about you? Have you made any nice dotticures recently?

Opacity: 8/10
Colour, prettiness: 10/10
Durability: 8/10
Value for money: 9/10
Overall: 9/10
Buy again: Yes

Thursday, April 25, 2013

Barielle ~ Jordana’s Skinny Jeans - with holo topcoat and stamp


Barielle ~ Jordana’s Skinny Jeans
Denim blue with blue and silver shimmer with a metallic finish

I have a funny relationship with Barielle’s polishes. I usually like them when I see them, and I buy some, but then after having worn them once, I’m not convinced any more, and I usually get rid of them. So I only have a few left in my stash now. Having said that, when I saw “Jordana’s Skinny Jeans” I knew I had to at least try it. I mean, I can always pass it on if I don’t like it anyway.

But let me tell you, that this particular Barielle is going to stay with me. The formula is fantastic, and it’s a one coater! Drying time is good and it looks really great on the nails. What is there not to love!?

I gave it two coats out of habit, but I can assure you that it wasn’t really necessary. Here’s what two coats, and no topcoat look like:


Pretty, isn’t it?

I applied a layer of China Glaze “Wireless Holographic Top Coat” over it. It doesn’t give much of an effect in ordinary lights, but here’s what it looks like under a light bulb:


I like that!

Then I stamped on it. I used Mash’s stamping plate Mash-43 and stamped with Essie’s Blue Rhapsody from their Mirror Metallics collection from last year. I sealed it all with a layer of Poshé top coat, and here’s a pic from my lightbox so you can see the lack of holographic effect in low lights:


And here’s a pic under the light bulb:


The polishes I used:


I really like this, and I’m so positive over the fact that I’m actually getting to keep another Barielle :D I also love this stamping design with the bubbles, it’s a great design, IMO!
Do you like this?


Barielle ~ Jordana’s Skinny Jeans
Opacity: 10/10
Colour, prettiness: 7/10
Durability: 8/10
Value for money: 9/10
Overall: 8.5/10
Buy again: Yes

China Glaze ~ Wireless Holographic Top Coat
Opacity: -/10
Colour, prettiness: 5/10
Durability: 8/10
Value for money: 5/10
Overall: 6/10
Buy again: No

Wednesday, April 24, 2013

Sation ~ Let’s mingle and jingle - with holo dots


Sation ~ Let’s mingle and jingle
Blue jelly base with sparse silver glitter

Let’s mingle and jingle is from Sation’s Holiday Golightly collection from 2012.

The formula was a challenge. It was thick, which I usually don’t mind, but that, when combined with the fat brush, made it almost impossible to paint on properly. Drying time is also on the slow side, giving it attributes which when taken together make me wonder if this polish needs to live in the box of shame!

It took two coats to achieve this look:


And from a different angle: 


I must admit that I’m willing to forgive this polish for being so difficult, because I really like the way it looks. And it’s perfect for all sorts of nail art,
I like that!

So I decided to go for a few simple dots today. I used Color Club’s “Over the Moon”, which is a strong blue linear holo, and I used Catrice’s Quick Dry & High Shine topcoat to seal the whole thing up:


These last two pictures are taken under a light bulb so the holo shows itself:


And here are the polishes lined up for the camera:


I have decided to keep this polish for now – I seriously need to try and stamp on it and perhaps even make a gradient with it. If I get just as upset with it the next time around, I might change my mind and let it go! :D

How about you, girls? Would you keep it?


Opacity: 7/10
Colour, prettiness: 7/10
Durability: 8/10
Value for money: 8/10
Overall: 7.5/10
Buy again: Undecided 

Tuesday, April 23, 2013

piCture pOlish ~ Paradise - with peacock

piCture pOlish  ~ Paradise
blue-green jelly base, very fine purple glitter, and small hot pink holographic glitter

This is my second polish from piCture pOlish, and it’s not going to be my last. I’m very impressed with the quality of this brand.

The polish appears a bit thick, but it applies easily and covers excellently. I used two coats for this mani, and the drying time was good too. I’ve only got positive things to say about this polish :)

Here’s what she looks like in all her glory. Two coats and one coat of Catrice Quick Dry & High Shine topcoat:


And from a slightly different angle:


The colours reminded me of peacocks, so I stamped appropriate designs on this. I used stamping plates from Bundlemonster. BM-212 for the “feathers” and BM15 for the peacock itself. I stamped with “Stamp me! Silver” stampy polish from Essence and China Glaze “Split Perso-nail-ity” from their Tranzitions collection that came out recently.

Here are the feathers:


And here’s the full mani with the peacock on the thumb:


It’s all sealed up with a layer of Poshé top coat.
  
Here are the pretty polishes lined up:


I’m not 100% satisfied with this myself. I would have liked the silver lines to have been more clear and crisp. So I’m going to try out this design again because I like it a lot, but with different polishes :)

So, what’s your verdict? Do you also like peacocks?

Opacity: 7/10
Colour, prettiness: 9/10
Durability: 8/10
Value for money: 8/10
Overall: 8/10
Buy again: Yes


I bought this polish myself, and it's available on norwaynails.com.

Norway Nails have kindly offered my readers a 10% discount code. Just use the code RAINBOWIFYME10 at checkout, and you'll be getting 10% off your purchase.

Monday, April 22, 2013

Nailstation ~ French Riviera


Nailstation ~ French Riviera
Turquoise/seagreen metallic shimmer

This is my first Nailstation polish and I loved it even before I got it onto my nails. That seagreen/turquoise colour is so me!

The formula is good, almost smooth, and the brush has a good size without being one of the wide brushes that I like so much. It took two coats to reach desired opacity. I made my second layer pretty thick because this polish is self-levelling and to minimize the visible brush strokes. Drying time is okay though, so I didn’t sit and wait all evening for it to dry :D

Enough of the talking, here’s the polish in all its glory:


And from a different angle:


I just love the shine, the depth and the colour of this polish. It’s really amazing, and even though I’ve never been to France, I think that French Riviera is a good name for it. Imagine swimming in water this colour!! Wow!


I can’t praise this polish enough. It’s pretty, easy to work with, has beautiful shine and yeah… it’s just beautiful! A total winner!


Here’s how I actually wore this:


I took my new Kiko Sugar Matte #644 Sea Blue, and made a trail of blue over each nail with my dotting tool:


This is the first time I try a Kiko Sugar Matte – I’m definitely going to play more with them!


French Riviera is so beautiful. I just couldn't stop staring at my nails!


Opacity: 7/10
Colour, prettiness: 10/10
Durability: 8/10
Value for money: 7/10
Overall: 8/10
Buy again: Yes

Sunday, April 21, 2013

OPI Liquid Sand ~ The Impossible


OPI Liquid Sand ~ The Impossible
Reddish base with glitters and stars

Here’s  the other one of my liquid sands from OPI’s Mariah Carey collection.

The polish applies easily, and I used two thin coats for to make it opaque. Drying time was on the slow side, just like the other liquid sand was. But hell, I managed :) I wanted the full effect of the liquid sand, so I didn’t apply any topcoat.

So here it is:


The stars are shy! I decided not to fish for them, but to just see how many I would get without making an effort. The answer is three. One on each of my ring fingers, and one on my left thumb. Not impressive!


There’s something about the tone of colour that doesn’t appeal to me and doesn’t quite suits my skin tone. The polish is red-ish/pink-ish, but the undertone has a coral note that I do not like.


I wore the polish like this for a day before I changed it to something else. And if I decide to keep this and use it again (not guaranteed), then I’m definitely going to add some nail art to cover up a bit of the coral colour.

Do you like the liquid sand polishes and have you jumped that bandwagon yet?


Opacity: 7/10
Colour, prettiness: 3/10
Durability: 8/10
Value for money: 6/10
Overall: 6/10
Buy again: No

Saturday, April 20, 2013

Femme Fatale ~ Dragonscale - Lots of pics!


Femme Fatale ~ Dragonscale
White base with a golden green shine and golden flecks

Dragonscale is an effect polish, which means it’s meant for layering. I wasn’t in the mood for layering over black, and I knew that this would look the best over a dark base. I chose to use a P2 Color Victim polish as my base, namely “Blue’s Brothers”, which is a marine blue and very squishy looking. I’ll show you how that looks on its own later on – because this post is about the Dragonscale.

I cut striping tape into little pieces and applied them to my nails, and then I painted one coat of Dragonscale over it. I removed the tape immediately after having applied the layer of polish. Here’s the result:


I deliberately made the stripes different in length to achieve a cool look.


Here it is from a different angle:


The flecks makes this polish spectacular, I really like the shimmer it has, and the name fits it just perfectly!


It’s amazing what good coverage Dragonscale has. This is just one coat over a very dark blue:


The polish is a colour shifter. It shifts between green and purple, even though green is definitely the prominent colour. This angle shows a bit of the purple:


Femme Fatale writes about Dragonscale:
It is also the nail polish version of our Golden Peridot eye shadow! 

In that case I’d love to get my hands on that eyeshadow too! I can only imagine how pretty that is.

Here's a bonus picture I took in my local DVD store. I'm holding a Simpson's movie:


It's amazing how the green holo of the box makes the polish change its colour too! 

Here's another thing I did with this polish:


I took a dark green polish, L. A. Girls Metallic "Deep Sea Mica", and applied two coats as my base colour. After having let that dry, I applied one coat of Dragonscale, and before it dried, I dapped it with a kitchen sponge to remove some of the effect polish.


Pretty cool, don't you think?? This polish has heaps of options in it!

So - what do you think of effect polishes like this one? I know I like them!


Opacity: 8/10
Colour, prettiness: 8/10
Durability: 8/10
Value for money: 8/10
Overall: 8/10
Buy again: Yes