Showing posts with label striping tape. Show all posts

Tuesday, August 1, 2017

Holographic tape stripes

Holographic tape stripes

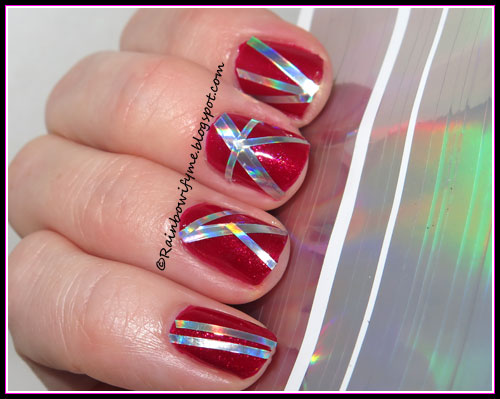
Today I'm trying holographic nail tape. It comes on a sheet and the stripes have various widths. The tape looks like this:


I painted my nails and when the polish was dry I placed the holo tape in random patterns. I topped it with topcoat to secure the tape. It ended up looking like this.


The holo effect is really good and I love the shine of the tape.


Tuesday, February 3, 2015

Colors by Llarowe ~ The Man in the Red Suit


Colors by Llarowe ~ The Man in the Red Suit
Cherry red linear holo

I’m in a red kind of a mood today, and I checked out my boxes of untrieds to see if there should be a red that fitted my mood. There was! I found The Man in the Red Suit, which is from Llarowe’s Christmas collection 2013! So yes, it’s been sitting unnoticed in the box for over a year, poor little polish!

The formula is great and application was really easy. This is practically a one coater! I used two coats, both out of habit but also because that’s the way I roll, haha! The drying time between the coats is good too.

Dudes and dudettes, this polish is an absolute beauty!

Two coats and no topcoat – flash picture:


The colour is amazing and the rainbows are stunning!


The polish is also beautiful in lower lights. This is where you can really see that this isn’t a true red. I love this colour!


I added more holo and some glitter too! I applied a thin stripe of glitter down the sides of my pinkie and my pointer. The glitter is from H&M and is called Silver Frost. On my ring finger and my middle finger I made candy cane stripes. I used striping tape and a silver holo from Urban Outfitters called Silver Holo. Great and very innovative name :D Here’s the final result:


Me and striping tape aren’t the best of friends. It’s such a hassle, but I admit that I like what you can actually do with it.


The polishes: 


I love how this turned out. The Man in the Red Suit is a great polish and I really like how this mani came together.


Number of coats: 2 (but 1 was enough)
Drying time: Fast
Durability: Good
Finish: Linear holo
Overall impression: Amazing colour, great quality, fantastic rainbows.
Buy again: Yes

Wednesday, August 6, 2014

Glittering Elements ~ Don’t Pet the Cheshire!! & Meet Alice ♥


Glittering Elements ~ Don’t Pet the Cheshire!! &  Meet Alice ♥
Deep holographic purple and light blue (not so strong) holo

Don’t Pet the Cheshire!! and Meet Alice ♥ both come from the collection Alice in Hololand. There’s another one, which I’ll probably show you tomorrow if all goes well.

I started out with two coats of each polish. The formula is good, as I’ve come to expect from Glittering Elements, and the drying time between coats is a little bit faster than average. The holo effect is waaay stronger in the deep purple than in the light blue.

Take a look at what it looks like with a flash. Two coats, no topcoat:


And they’re both pretty in low light too:


So, I wanted my mani to represent the Cheshire cat from Alice in Wonderland. I stamped paw prints on my index and my pointer – the print comes from an old Essence plate without name or number. I stamped a cat’s face on my thumb – I found that design on Fauxnaud plate QA40.


I taped my nails across with striping tape and applied a layer of the deep purple over the blue. I removed the tape right away. You’re looking at the final mani taken with flash here:


It’s not very often my thumb enters the photos, but today it was necessary :)


I love the Cheshire cat and was really excited to find such a beautiful polish with its name on it. I mostly bought Meet Alice ♥ because she was a part of the trio, and I found it odd to buy two thirds of an Alice-collection and then leave Alice out; hahaha! But she’s great as a base for nail art so I don’t regret buying her.


Number of coats: 2
Drying time: Pretty good
Finish: Holos!
Overall impression: I like both colours, but the purple Cheshire stole my heart!
Buy again: Yepski

Monday, April 28, 2014

Musical Mani Monday, week 11: Deep Purple ~ Gipsy’s Kiss


I’ve been looking forward to this particular challenge. Not because I had in mind what to do, because I had no clue, but I do really like Deep Purple.

But after having been excited over the song choice for a while, I started to think about how I would interpret it. I knew that I wanted to include purple, but how on earth do you interpret “Gipsy’s Kiss”? I was around clothing, colours, impressions of gipsy’s lives, you name it. This is the mani I ended up with:


Do you like it? Here’s the gipsy that inspired me:


Disney’s Esmaralda from the Hunchback of Notre Dame! I found my inspiration in her clothes.


The light blue is Darling Diva’s Blue Diamond; a lovely sky blue holo. It’s a dream – and it’s a one coater. The gold stripes are made with Sally Hansen’s Gilded Lily from the Salon line. And the deep purple on my tips is Pahlish’s My Bespoke Psychopath, a beautiful holo, also a one coater.


Here’s what the mani looks like in lower lights and without flash:


Here’s the Darling Diva “Blue Diamond” I used as my base colour. This, sweet ladies, is one coat only!


And here are the polishes I used.


That was the elleventh challenge in my Music Mani Monday. Next week is the last one up: Royals with Lorde. Please stay tuned.


Now please head over to the other girls to see what they came up with!


Monday, March 24, 2014

Musical Mani Monday, week 6: Lady Gaga ~ Americano (with blooper!)

The only thing I knew when I started my mani was that I didn’t want to make American flags on my nails. Don’t get me wrong: There’s nothing wrong with American flags, but honestly, they’ve been done a hogzillion times before, and I wanted to think outside the box this time. This is a challenge after all.

So I read the lyrics, which is about same sex-marriage, but no, no inspirational bells ringing.

Then I read the background about Americano and that helped. The song was influenced by the events surrounding the repeal of the controversial California Proposition 8 (a ballot proposition that defined marriage as a union between opposite-sex couples, thereby prohibiting and invalidating same-sex marriage throughout the state) - as well as the growing struggles of Mexican immigrants. Lady Gaga said she wanted to make this song really Mexican, with the struggle the Mexican people have gone through for freedom, for a better life, and so those ideas are directly implemented in the song. The singer's main objective was to "go full on Mexicano”. Great!

Here’s what Mexico can look like graphically spoken; green, white and red:


And my mani ended up looking like this:


So what I did was to start with three layers of OPI’s Alpine Snow. It’s often praised to be a great white, and I use it a lot for my nail art. But as a white base it just doesn’t do it for me. Three coats is at least one too many in my opinion! I applied a layer of Poshé topcoat to make sure it dried ok before the next step.


Next step was taping the nails diagonally across. When that was done I applied a layer of Green Glitter from Amour. Green Glitter is a totally appropriate name for a green glitter, in my opinion :D I gave it another layer of Poshé topcoat and waited until it was dry. Then I applied tape on top of the green glitter and added three pieces of striping tape on the white base. I applied a layer of Lilypad Lacquer “Rebel at Heart” and removed all the tape straight away.


I took a picture of the white and green alone too, I think that looked pretty cool.


And now for the blooper!! I had to redo the green on the middle nail, because when I removed the tape after having applied the red, it took all the green glitter with it!! And here’s how odd that looked like:


I was not happy when that happened, that’s for sure! Not a happy camper at all. Anyway, here are the pretty polishes:


That was the sixth challenge in my Music Mani Monday. Stay tuned next week to see how I interpret The Monster with Eminem and Rihanna! 


Check out what the other girls made: 

Thursday, December 5, 2013

Alanna Renee ~ Sugar & Spice & All Things Nice


Alanna Renee ~ Sugar & Spice & All Things Nice
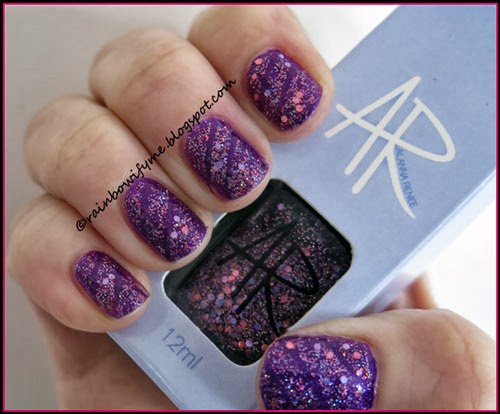
A mix of pink and purple holo hex glitter and holo particles

Let me show you another Alanna Renee polish. I showed you “Snips &Snails & Puppy Dog Tails” the other day, and today it’s “Sugar & Spice & All Things Nice” which I’m going to show off. I think the names are a bit long, but seriously, I love them! Sugar & Spice & All Things Nice is a mix of pink and purple holographic hexagons and glitters, mixed with holographic particles. It sounds like my kind of polish, doesn’t it.

I chose another Golden Rose Matte Velvet as underwear for this pretty glitter, namely #107, which is purple with shimmer. A beauty, which is well pigmented and dries really fast. I’ll show you what it looks like at the end of this post.

I placed some striping tape on my nails before I applied the glitter. I pulled it off again right after application, and while the glitter was still wet. On these first pictures it isn’t really visible what effect that had, because these first pictures are taken in full sunshine. There’s a layer of topcoat over, btw.

Take a look at how pretty it is:


On this next picture you can almost see the stripes. Check the middle nail, that is the one it shows the most on.


I really like the look of this glitter!


Here’s a blurry pic to let the holo glitter show off!


This picture is taken in daylight, but out of the sun. That shows the stripes really well, and I love that I made that detail!


I promised you to show you the Golden Rose Matte Velvet I used as underwear. The entire collection is great as base for other stuff. They’re pretty much all one coaters and dry really fast. If I had worn this #107 alone, I would have applied two coats, but this dear ladies, is just one coat:


I’m happy with this. Would you also have been happy, if you were me?


I bought Sugar & Spice & All Things Nice on norwaynails.com.

Norway Nails have kindly offered my readers a 10% discount code. Just use the code RAINBOWIFYME10 at checkout and you'll be getting 10% off your purchase.

Thursday, November 28, 2013

Nicole by OPI ~ Listen to your Momager!


Nicole by OPI ~ Listen to your Momager!
Dark blue shimmer

The stupid name says it all: We’re now back at OPI’s polishes! Jeez, they should fire the dink-heads who make up their polish names! Anyway – Listen to your Momager! is from the Kardashian Kolor collection from holiday 2012. NOPIs aren’t easy to get here usually, but this collection was suddenly for sale in a local discount shop here. I wouldn’t have bought any if they had been full price (because polishes here are usually ridiculously expensive), but with a good discount? Yes please!

Listen to your Momager! has a good formula. The polish glides on easily and covers well in two coats. Drying time is pretty good too. I must admit that I looked at the bottle with suspicion – and I wondered why the heck I bought it. I mean, I have a ton of dark blue shimmers, and do I really need another one? But girls, once this was on I had no regrets. This is definitely one of the prettiest blue shimmers I have. It’s deep and the shimmers are so big that they’re almost flecks.

Enough talk – you’ve got to see it yourself! Here it is, two coats, no topcoat yet:


Look at that shine and that shimmer! Isn’t that just looking cool?


One last pic on its own:


Then I taped my nails with striping tape. I made a cross on each nail and then I applied two layers of Ulta “Indigo-go Girl”. That’s indigo hexagons and glitter in a slightly tinted base. I thought this would work on its own, but it doesn’t really, which is why I layer it over the NOPI! Anyway, I removed the striping tape before the polish had dried, and then applied a layer of Poshé topcoat. And here’s my final mani in the sunshine:


There’s so much shine in this that it’s hard to see the cross I made, isn’t it?


It’s like a blue disco ball on my nails. I dig this!!


Here’s one last shot in ordinary daylight. This was you can see where the striping tape was!


I love both these polishes. I was impressed with the shimmer of Listen to your Momager!, and a little bit disappointed that Indigo-go Girl isn’t a polish that works on its own. But yes, despite the pathetic naming convention, they’re both keepers!

Listen to your Momager! is a stainer. But for some weird reason it only stained the nails on my right hand, even though the two hands get the exact same treatment. Weird. 

Thursday, October 31, 2013

Chirality ~ Convergence


Chirality ~ Convergence
Plum holo

Here’s the second Chirality polish I bought from Edgy Polish, which is a Swedish webshop that sells cool indie polishes.

I had forgotten that Chirality’s holos like an aqua basecoat, so I had just applied my regular basecoat. Fortunately I remembered it before I applied the polish, so I slapped on a layer of aqua underwear before I started polishing.

The formula is great over an aqua basecoat. No dragging, no having to be careful and only use light brush strokes. Just great polish coming out of the bottle. It took two coats to make this opaque, and the drying time was good too!

I had no sun available (I do live up in Northern Europe after all), so all the pics are taken with flash. Ladies – this is two coats, and no topcoat:


The holo effect is the same kind as in its sister Asymptote’s (link here) - it’s like a glow from within, that even shows in lower lights.


The plum is a bit dusty – I do wish it had been more “clear”, but hey, you can’t have everything you wish for, can you :)


This looks as if my nails are on fire!


I wanted to add a darker colour to this, to give it a bit of edge. I used a deep shimmery burgundy from Pupa with the number M178. I taped three of my nails and applied the Pupa on the free bit of the nail. Then I made a thin stripe next to the filled in area. And lastly I used a craft punch to make a heart shaped hole in a piece of masking tape; applied it to the nail and filled it in.

I finished the whole thing off by applying one layer of Poshé topcoat, and this is my final mani, right here:


I made hearts on my ring fingers and my thumbs. The heart is a little bit too big for my ring finger, but the craft punch only came in one size so that’ll have to do, LOL!


I am glad to see that Poshé doesn’t dull the holo effect in Convergence – that’s really nice.

I like the quality of the Chirality polishes. They cover nicely and last well. I do wish and hope they would consider making clearer colours too though, so I’ll follow them closely :)


Opacity: 7/10
Colour, prettiness: 5/10
Durability: 8/10
Value for money: 6/10
Overall: 6.5/10
Buy again: No

You can buy Chirality polishes from Edgy Polish – they ship internationally.
You can find more info on Edgy Polish’s Facebook page, link here.