Wednesday, December 31, 2014

Morgan Taylor ~ To Rule or Not to Rule & Wrapped in Riches


Morgan Taylor ~ To Rule or Not to Rule & Wrapped in Riches
Magenta jelly with magenta glitter & Teal microglitter

Today I’m going to show you two of my Morgan Taylor polishes, both glitters, but very different. They are both from The Royal Life collection.

The first one is To Rule or Not to Rule. It’s a magenta base with different sizes of magenta glitter. The formula is good, but the bigger glitters make it difficult to get close to the cuticles without actually touching them.

It takes two coats to achieve full opacity and the drying time between the layers is good. I applied a layer of topcoat before I took my pictures, and that made the glitters come beautifully to life.

Two coats plus a layer of topcoat:


I love the way the glitters swim in the jelly!


The colour is really nice too.


The second polish up is Wrapped in Riches. It’s a teal almost turquoise glitter in a teal jelly base. The polish is really easy to work with and covers well in two coats. the drying time is really good.

Here’s two coats and a layer of topcoat:


A girl can never get too much glitter!


This is a really cool glitter, I like the colour and the way it looks.


Verdict:
This is two cool glitters from The Royal Life collection. I like them both.


Number of coats: 2
Drying time: Fast
Finish: Glitter in jelly
Overall impression: Good to work with, glitters that don’t require layering
Buy again: Yes

Tuesday, December 30, 2014

Spell Polish ~ No Place like Home


Spell Polish ~ No Place like Home
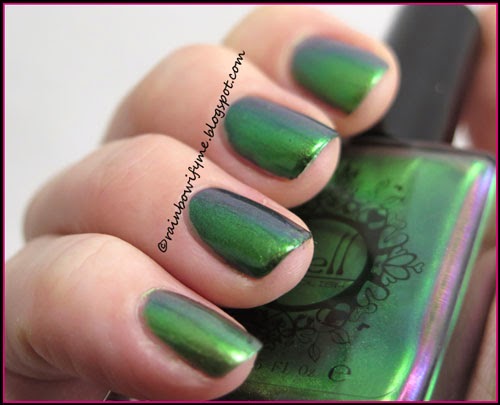
Green to purple duochrome

I thought that I might as well show you the other two Spell Polishes I bought recently. It’s time to take a closer look at No Place Like Home, a lovely green to purple duochrome. 

The formula is good and easy to work with, and it takes two coats on its own to make it opaque - that's really nice. Drying time is pretty average. 

Take a look at the green-ness:


This polish is super shiny!


Here's the green side of the polish. It's quite an unusual green in a duochrome - I like how unique it is!


I sponged a bit of glitter by the base of my nails: Picture Polish's Ariels Tale. When I look at the pictures I can see that the green isn't quite right, but... yeah, oh well :) 


One last shot: 


Here are the pretty sisters: 


Every bottle of Spell Polish comes with a little card with a rhyme on. Here’s the card that came with No Place Like Home:


Number of coats: 2
Drying time: Average
Finish: Matte with shimmer. Really comes to life with a topcoat
First impression: Unique colour shift and super shiny polish.
Buy again: Yes, it's unique


I bought my Spell polishes from norwaynails.com.
You can find more info on NorwayNail’s Facebook page, link here.

Norway Nails have kindly offered my readers a 10% discount code. Just use the code RAINBOWIFYME10 at checkout, and you'll be getting 10% off your purchase.

Spiders on OPI DS Signature


Today I’m going to show you some really cool spiders

I matched them up with OPI DS Signature and look how cool it ended up being:


I stuck the spider on in wet topcoat and it fitted the curve of my nail really well. It is a little big though, but bear in mind that my nails are relatively small.


Here’s a low light picture. The stamp is from the XL stamping plate “K”.


The verdict:

Pros:
Really cute spiders for nail art
Cheap: Two cost US$2.16 at the moment and they can be reused

Cons:
They can be a bit unpractical


Monday, December 29, 2014

Spell Polish ~ Toe of Frog


Spell Polish ~ Toe of Frog
Olive Green with gold and purple undertones and a matte finish

My Spell Collection is slowly growing. I started out with two, and now I’ve got three more – all of them received in monthly packages from Norway Nails.

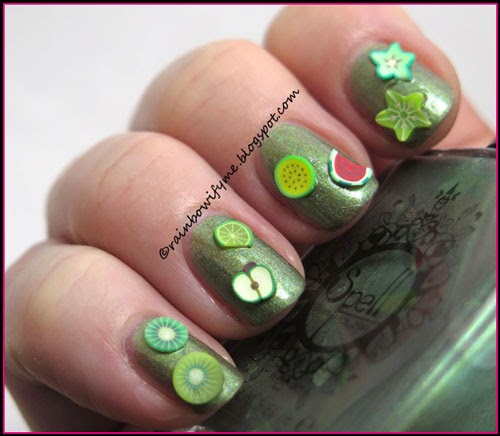
Toe of Frog is olive green – not a colour I’d normally chose. But it’s nice to be forced outside the comfort zone once in a while!

The polish looks thin in the bottle, but it only took two coats to make it opaque. It dries up to a silky matte finish, that’s quite easy on the eyes.

Here’s two coats and no topcoat in my lightbox:


It’s hard to see the shimmers that are going on, but you can see them if I turn on the flash for you:


That’s pretty, yes? And the polish also changes character when a shiny topcoat is added – I like it much better with topcoat. That’s how it usually is for me with mattes – I love shiny things, so topcoat usually makes them prettier for me. Here’s what it looks like with topcoat:


And a low light picture:


I wanted to make this mani fun! I found my little box of fimo fruit slices, found a bunch of green(ish) fruits and stuck them onto my nails with topcoat. I love this end result:


The low light picture:


Every bottle of Spell Polish comes with a little card with a rhyme on. Here’s the card that came with Toe of Frog:


Number of coats: 2
Drying time: Average
Finish: Matte with shimmer. Really comes to life with a topcoat
Buy again: I’m not sure, mostly because olive isn’t my colour


I bought my Spell polishes from norwaynails.com.
You can find more info on NorwayNail’s Facebook page, link here.

Norway Nails have kindly offered my readers a 10% discount code. Just use the code RAINBOWIFYME10 at checkout, and you'll be getting 10% off your purchase.

Ellagee Prototype ~ Dark Blue glitter


Ellagee Prototype ~ Dark Blue glitter
Clear base packed with dark blue and holographic microglitter

Here’s another one of the prototypes I bought when Laura from Ellagee offered unreleased prototypes. I must admit I was quite impressed with the prototypes I received. Mystery polishes are my Kryptonite – I love surprises, and especially nice surprises like this one!

This midnight blue glitter is so crammed into the bottle that it works on its own. The formula is obviously a bit on the thick side, but I had no issues applying it anyway. It only took two coats to achieve desired opacity and the drying time was fast, also considering the fact that the layers went on a little thick. And girls, I love this glitter!

Take a look at two coats and a layer of topcoat; the pic is taken with flash:


It’s almost even prettier in low lights.


Here’s an intentionally blurry picture to show off the holo glitters:


I added some snowflakes. I had a sheet of snowflake stickers that I thought would go perfectly with this blue prettiness. I even added a Christmas tree on my ring finger - it's a little late now, but still!! :D


The stickers are pretty, I really like them, but they are a bit stiff. That means that it’s hard for them to stay put on my curvy nails. Even a layer of topcoat couldn’t really hold them down; take a look at my pinkie – see how the sticker sticks out!


But nice, yes, I like the final mani, and I love the glitter!


Number of coats: 2
Drying time: Good
Finish: A massive amount of glitter in a clear base
Overall impression: Fantastic glitter! I love glitters that are more than just toppers.
Buy again: Yes

Sunday, December 28, 2014

Ellagee Prototype ~ Green glitter


Ellagee Prototype ~ Green glitter
Clear base with green and iridescent glitter and hexes

I was thrilled when Laura from Ellagee asked if anybody was interested in a few unreleased prototypes. Yes please!! They obviously don’t have names, so I’ll just refer to them after what they look like. So this one is Green Glitter.

I have layered it. I think I could have made this opaque on its own in three coats, but I honestly wasn’t in the mood for that. So I applied one layer of Golden Rose Matte Velvet #107, which is my to go purple base for nail art. I love the fact that you can make it opaque in one coat.

When the purple was dry I applied a layer of Green Glitter. It’s easy to work with and the glitter spreads out evenly and easily and dries relatively fast. I applied one coat of Essence Gel Look Topcoat before I took my pictures.

So here’s one coat of Green Glitter over purple:


I love that there are various sizes of glitter throughout the polish.


Glittery, sparkly, lovely…


Here are the two polishes together. Note how much I’ve used of the Golden Rose! O_o


Number of coats: 1
Drying time: Good
Finish: Glitter in a clear base
Overall impression: This is a nice, green glitter that can be used over many colours.
Buy again: Yes

Glittering Elements ~ Hidden Oasis


Glittering Elements ~ Hidden Oasis
Teal packed with golden shimmer and holo effect

When I can’t decide on what to wear on my nails, I often ask my boyfriend to pick a random colour. Today he picked green, and I was sure that Hidden Oasis was green until I actually got it onto my nails. Now I’m not so sure.

Let me show you what I’m talking about in a minute. The formula is good and easy to work with. It took two coats to make this opaque and the drying time between the coats is good.

The colour on my nails wasn’t really green though, more teal. It turns out that the golden shimmer mixed with the teal tricked me into believing that the polish was actually green. Funny that!

Here’s what it looks like; two coats and no topcoat:


Pretty shimmer, yes? I know I like it!


Here’s an intentionally blurred picture to show off the holo goodness:


Here’s a low light picture. All the shimmer almost look like microflecks!


I stamped swirls on it. I used a motif from the stamping plate Q-Girl010 and I stamped with Sally Hansen Insta-Dri  “Whirlwind White”. I love that for stamping.

Here’s my final mani:


And a low light shot:


I really like Hidden Oasis, even though it tricked me into believing it was green! :D


Number of coats: 2
Drying time: Pretty good
Durability: Good
Removal: No worries
Overall impression: Great colours and I love the mix of holo and shimmer!
Buy again: Yes

Saturday, December 27, 2014

Honest advertising?


Dear polish-makers, dear bloggers,

I’ve wanted to get this off my chest for quite a while now, and today is the day.

It’s a well known fact that indie-makers and bloggers go together hand in hand. The indie-makers make pretty polishes and us bloggers display them on our blogs. Sometimes we get the polishes for free in return for a review, most of the time we buy them ourselves. Fact is that our blogs are a huge display of pretties, just wanting their ten minutes of fame.

There’s nothing wrong with that.

What really bugs me is that so few want to show the true colours of the polishes, so to speak. Many are the times where I’ve fallen in love with a polish on a blog, bought it, only to find out that it doesn’t at all look like the pictures I’ve just seen on my monitor. Photoshop and similar enhancers, ladies, are not really your friends, but sneaky tricksters who want to blow your cover and show you up as a visual teller of untruths. Then people who read your blogs stop liking you so much, and treat what you say, and show, with a well earned measure of distrust and disbelief. Catch me once, sure, go ahead - but you won’t do it twice. Credibility is fairly hard to achieve, so easy to lose.

It’s not just enhancing of colours and changing of colour depth and god knows what else tricks some girls use to make the polish prettier. It’s also the fact that so many girls chose not to show what a polish looks like in natural lighting. Everybody knows that a holo looks great in the sun and I obviously want to see that too. But I spend way more time indoors than I do in the sun, so I want at least one picture of what the polish looks like in indoor environment. Is that too much to ask?

I saw a beautiful polish in a Facebook group. It looked fantastic, and the holo flame was adorable. I asked if anybody had a photo of it in lower lights and the girls snorted! Why would I want to see that? There were already beautiful pictures of the polish! And there were. I bought the polish, and it looks adorable in the sunshine. It doesn’t look good on me at all in lower lights, it turns out that it’s not my colour. What a waste of $11 plus postage!

So: Dear indie-makers, dear bloggers. Please don’t let your egos come in the way. Please show us what the polishes really look like, not how they should look in your head. That would be honest advertising!

Thanks for taking the time to read this ♥

A England ~ Dragon


A England ~ Dragon
An Autumn mani

A England’s Dragon has been sitting in my box of untrieds ever since it came out, so it’s been there for quite a while now. I think it’s because it’s more autumn-y than I usually wear – I’m definitely not an Autumn girl.

But today I’m going to take it all the way, because Autumn is running out!

Here’s my final Autumn mani:


And here’s how it all started! Two easy coats of A England’s Dragon – great formula, good drying time:


On top of that a layer of “Tequila Lime Glitter” from an indie brand called MMM! Nails. I got this in a swap, and it’s the only bottle I’ve had from that brand. It’s a clear base with green microglitter and silver hexes. I didn’t fish for the hexes and I only got a couple of them.


Then I stamped on it. I found a leaf motif on the stamping plate Apipila01 and I made a stamping gradient with two polishes from Sally Hansen’s Insta-Dri collection: Lightening, a crème yellow, and Orange Impulse, an orange crème. This picture is taken before I topcoated it.


And here’s a flash picture:


The four polishes I used:


This is way out of my comfort zone – I don’t wear any Autumn colours, clothes or manis, as a rule. But I must admit that I think it’s pretty cool. What say you?


Dragon:
Number of coats: 2
Drying time: Good
Finish: Scattered holo
Overall impression: A England is a great brand that makes good quality polishes. Dragon is no exception!
Buy again: Yes


You can buy A England polishes from Edgy Polish
You can find more info on Edgy Polish’s Facebook page, link here.

Friday, December 26, 2014

Glam Polish ~ Fruit of the Poisonous Tree


Glam Polish ~ Fruit of the Poisonous Tree
Rich deep purple with fuchsia/red/copper sparkle and scattered holo effect

Fruit of the Poisonous Tree is from the Welcome to Storybrook collection and is quite the most gorgeous polish in the collection. The colour is rich, deep, sexy and vampy - just to mention a few of the superlatives that spring to mind.

The formula is fantastic and the polish is almost self-applying. The drying time is a bit on the slow side but the coverage is really good. You could get away with one coat of this if you were in a hurry, although I used two coats and it did make a difference: It made the colour even richer!

Take a look at two coats and a thin layer of topcoat:


Look at those sparkles! Aren’t they just amazing???


The polish is also gorgeous in low lights. I seriously love this shade of purple.


I gazed at it for a long while, not really wanting to cover any of this prettiness up! At the end I went for a bit of glitter by the base of my nails; I used Delush Polish’s Nue Girl for that and I just sponged it one with a makeup sponge. I sealed the whole thing up with another layer of topcoat and here’s the final mani:


And a non-flashy picture:


Verdict:
I think I just got myself a new favourite purple! It’s amazing!


Number of coats: 2
Drying time: A bit slow
Finish: scattered holo with shimmer
Overall impression: That’s my new precious!
Buy again: Yes

I bought Red Handed from Edgy Polish. It sold out really quickly, but keep your eyes peeled, it might get back in stock!
You can find more info on Edgy Polish’s Facebook page, link here.