Thursday, August 15, 2013

Literary Lacquers ~ Raspberry Cordial?


Literary Lacquers ~ Raspberry Cordial?
Pink linear holographic with holo glitters added

This is the third holo from the Green Gables Collection, which came out this summer.

As with the other two that I’ve tried, I used an aqua base coat to make sure that the polish had the best potential to look great. And as with the 
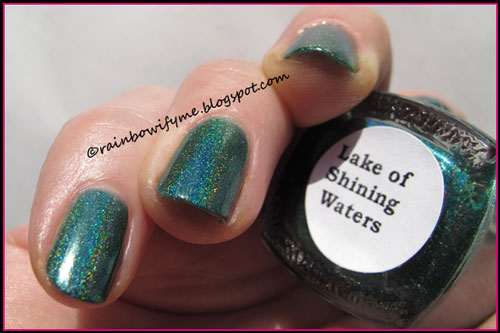
other two (Lake of the shining waters – link here – and Green Gables – link here) it took three coats before the polish was fully opaque. Drying time was pretty good though, so I didn’t mind the multiple coats that much.

And here’s what the polish looks like in the sunshine. There’s no topcoat involved just yet:


The holo isn’t as strong in Raspberry Cordial, but it’s prominent enough for me. And it’s got glitters too – I love that combo!


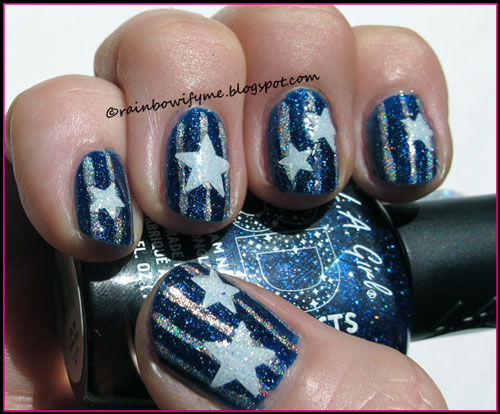
I stamped on it! I used my XL stamping plate O for the flowery design, and I stamped with “Bleu Mystérieux” from Bourjois. It’s not a stamping polish as such, but it’s a deep blue and it works great over colours like this one. I didn’t topcoat it before taking these pics:


I quite like how this turned out. I think the blue looks really great over the pink. It takes a bit of the cute and adds a bit of edge. I like that!


One last picture, just because!


So all in all – yes, I like this polish. I would have loved to have had another holo with glitter. You should know by now that I’m a holo glitter fan, so to have both in one polish is a double win!

Please tell me what you think of this in the comments below :)


Opacity: 6/10
Colour, prettiness: 7/10
Durability: 8/10
Value for money: 7/10
Overall: 7/10
Buy again: Yes

Wednesday, August 14, 2013

Stars and nail polish remover from Born Pretty Store


Stars and nail polish remover from Born Pretty Store

Here is the link to my new star stickers (click here) and this is what they look like:


The sheet got a little wrinkled in the mail, but it doesn’t affect the stars, so no worries there. The big sheet contains a lot of stars, and I mean a lot! Here’s a close up of some of the stars. I chose number 6, which can be used on pretty much every nail polish colour.


I chose a dark blue with holographic glitter, and I made stripes with a holographic silver, before I added the stars. The stars are easy to apply, and once they’re on, they’re on, so be sure where you place them. I accidentally misplaced a star, and when I tried to take it off again it pulled some polish off. So place them where you want them in the first place! :)


 It says on the back of the sheet that the stars need two layers of topcoat after being applied. I applied only one at first, but concluded that it did  indeed need two, so I applied another coat shortly after, and that was just perfect.


Pros:
Easy to apply
Lots of stars in various sizes


Cons:
I can’t really come up with any cons, which has got be good.

The stars are on special at the moment, so you get a big sheet for only $0.99! And there’s free worldwide shipping.


The other thing I want to show you is a sponge nail polish remover with lemon aroma. (Link here)
It’s the first time I ever try a nail polish remover pot, so I was very interested in seeing if I like this way to remove my polish.

Here’s what the pot looks like:


And with the lid off:


Here’s the first mani I tried to take off. It’s basically a purple holo with a sponged glitter at the base of the nail. Let’s see how it goes. 


In with the first finger:


I moved my finger around and rubbed the nail against the sponge for maybe 10-15 seconds. And here’s what my finger looked like when I pulled it back up:


I had a feeling that it wouldn’t remove the glitter, and I’m actually impressed over how much of the glitter it really did remove. But not impressed by the little bit of sponge on the glitter! I can’t recommend using this remover for glitter manis – the glitter pulls little bits off the sponge! But it did remove all
the other polish. I tried a couple of other manis as days passed and it removed everything but glitter.

The remover is supposed to  be lemon scented, and it’s true that when you
pull your fingers out of the jar and let them dry, then there’s some lemon scent left. The remover itself has a really strong scent.

I recommend that you wash your hands before you apply new polish, because it does leave a film of something on your skin – perhaps it’s to keep your cuticles from drying out.

Pros:
It removes polish efficiently and quick
Your cuticles don’t dry out from it

Cons:
It doesn’t work well with glitter, which also damages the sponge
The scent is very strong

If you already like these polish remover pots, then this is a good buy. As I said to begin with: This is the first time I’ve ever tried one, and I honestly don’t think I need to remove my polish like this on a regular basis. I *do* use a lot of glitter too, which doesn’t really work with this remover.


Tuesday, August 13, 2013

Literary Lacquers ~ Green Gables


Literary Lacquers ~ Green Gables
Green linear holographic

This holo is from the Green Gables Collection, that came out this summer.

I used an aqua base coat to make sure that the polish would behave. I’m not sure that it’s really necessary, because I haven’t tried these polishes with a regular basecoat for underwear. The formula is quite good, I didn’t experience any problems with dragging or anything and the drying time is really fast. The only downside about this polish is that it takes three coats before it reaches its full potential. Oh well. I can live with that as long as the drying time is good.

Take a look at how pretty Green Gables is in the sunshine:


This is the second of three holographics in the series, and I love both the ones I’ve tried!


It’s amazing how pretty all the rainbows are!


I did however bling it up a bit. I taped the tips of my nails with striping tape and sponged glitter on them. I used Essence “Hello Holo”, which is a clear base absolutely packed with holographic glitter. I removed the tape right after sponging, and applied a thick layer of Poshé topcoat. And here’s my final mani:


The lines are a lot more visible and crisp in real life. Here’s a blurry picture, to show off the amazing holo effect in Hello Holo.


“What’s the verdict”, I hear you ask. The verdict, my dear friends, is that Literary Lacquers has managed to make two holos in a row, that are both right up my alley. Well done!

What do you girls think? Isn’t this really nice? And is there such a thing as “too much bling”?


Opacity: 6/10
Colour, prettiness: 8/10
Durability: 8/10
Value for money: 7/10
Overall: 7.5/10
Buy again: Yes

Monday, August 12, 2013

Foxy Paws ~ Purple Rain and Spit Spot


Foxy Paws ~ Purple Rain and Spit Spot
Purple linear holo and
Clear base with round glitters in black, turquoise, lavender, pink, fuchsia and holo silver.

Foxy Paws is a Danish indie brand. Purple Rain is part of the 80's Collection and Spit Spot is part of the Mary Poppins Collection. 

I started out with the purple holo. The formula is good, and the polish applies easily. It dries pretty fast too, but it does require three coats to reach desired opacity. It was amazing how big a difference the third coat made! The sun wanted to play with this polish – hooray!

Here it is in the sunshine. Three coats, no topcoat:


I love those rainbows!


Here’s what the polish looks like in the shade. The purple looks dusty and with a hint of grey.


I’ve said it before: I need my polishes to look great both in and out of the sunshine, so I decided to add glitter. I applied a coat of Spit Spot. At first I was sure that this wasn’t a keeper: The first layer I applied contained no less than five big pink glitters that ended up in a lump on my little finger! Yikes. And I couldn’t pull them off again with the brush, so I had to use a toothpick to get three of them off :D 
But practice makes perfect, so I was careful when I fished for the glitter: Not too much but just enough. After it was dry I applied a thick layer of Poshé topcoat to even out the small bumps the glitter left. And this is what the final mani ended up looking like in the sunshine:


The holo effect is dulled quite a lot, but I’m not surprised. One layer of suspension base with glitter and a thick layer of topcoat does tend to have that effect on holos.


The holo is still visible, and now I also like it out of the sunshine. 
Speaking of which: Here’s a picture taken in the shade:


Here are the two sexy Foxy Paws:

  
I’m glad I paired these two polishes and very glad that I ended up buying Spit Spot after all. I’m usually not a huge fan of great big glitters, but these actually work nicely for me.
 

Foxy Paws ~ Purple Rain
Opacity: 5/10
Colour, prettiness: 7/10
Durability: 8/10
Value for money: 8/10
Overall: 7/10
Buy again: Yes

Foxy Paws ~ Spit Spot
Opacity: -/10
Colour, prettiness: 7/10
Durability: 8/10
Value for money: 8/10
Overall: 7.5/10
Buy again: Yes

Sunday, August 11, 2013

Orly ~ Sparkling Garbage and No. 7 ~ Totally Teal


Orly ~ Sparkling Garbage (with No. 7 ~ Totally Teal)
Green jelly base packed with holo glitter

Sparkling Garbage is from Orly’s Mash Up collection from summer 2013. I have seen that it can be totally opaque on its own, but I was in the mood for layering! I started out with two coats of No. 7’s Totally Teal which is a lovely dark teal crème. The formula is great for crème, and so it the drying time. And I love the shine of this polish. Here it is without topcoat:


Isn’t that just a lovely crème and a perfect underwear for the Sparkling Garbage? I think it is!

So, I applied one coat of Orly. The glitter spread out easily and evenly without much effort at all. It dried pretty fast and I sealed the whole thing up with a layer of Catrice Quick Dry & High Shine topcoat. And here’s what my mani ended up looking like:


I think that “Totally Teal” is the perfect underwear for the glitter!


The pictures are all taken in the sunshine – look at that holographic glitter – it’s amazingly pretty!


Here are the sisters in crime:


I was thrilled to find out that Sparkling Garbage is more than a topper – and also to see that it’s really pretty with some darker underwear.

About Orly’s new bottle design: I like the new top, the ridges in the rubbery finish gives a really good grip to the brush. I’m not crazy about the new Logo. I think it looks cheap compared the the previous classic “O” on the bottle.

How do you feel about the new bottle design? Is is a win or a fail or don’t you really care at all?  :)

Saturday, August 10, 2013

Literary Lacquers ~ Lake of Shining Waters


Literary Lacquers ~ Lake of Shining Waters
Teal linear holographic

Last time I wore a holo from Literary Lacquers I did not like it, and I am not ashamed to say that the polish is no longer a part of my stash. It was “Greatest Treasures”, and her biggest sin was that she has autumn colours in her – and that showed clearly when she was out of the sun.

But Lake of Shining Waters is teal! And you know I love teal – and when the teal is also holo, well, then I don’t think I can possibly ask for more! So I obviously had to buy it.

Lake of Shining Waters is from the Green Gables Collection, that came out this summer.

I used an aqua base coat for this beauty. I don’t know if it was actually necessary, but I didn’t want to take any chances to screw this up. The formula of Lake of Shining Waters is good. It is easy to apply and it dries fast, but I did use three coats before I was satisfied. I’m willing to forgive that though, because take a look:


I think it’s absolutely stunning!!!
Here’s another shot:


I love the rainbows!


I also like the look of this polish out of the sun, and that is important to me. I do spend more time out of the sun than in it, so it’s not really enough if the polish can only make a rainbow in the sun, and not be special in the shade.


Now that the sun was out, I decided to pull out another holo, namely Gosh: Holographic Hero. I wanted to use this as my stamping polish – and I found some cute butterflies on my XL stamping plate K.

The butterflies didn’t come out as crisp as I wanted them to, but I think it looks alright anyway:


There’s no topcoat on these pictures, because I wanted to make sure that I had the pictures taken before the sun went down :D


I love pretty much everything about this polish. It’s so cool that I finally got a teal linear holographic!

Have you laid your eyes on this polish yet, or isn’t it your style at all?


Opacity: 5/10
Colour, prettiness: 9/10
Durability: 8/10
Value for money: 8/10
Overall: 7.5/10
Buy again: Yes

Friday, August 9, 2013

The Pink Evil Eye


Dotted nail art
My pink take on the evil eye mani

I’m in a dotting mood. Dots on dots on dots and so on, you know!

I originally got the idea for this when I did this mani on Aylin’s blog. This time I wanted to do it on my own blog and with different colours. I went for pink this time because that’s what I felt like.

I started out with two coats of Color Club’s “Halo-Graphic” from the Halo Hues collection from 2012. The formula is fantastic and the coverage is even greater. It’s almost a one coater, but I applied two coats anyway, just to make it look perfect. Drying time is amazingly fast. I love polishes like this.

I didn’t have sunshine available, so I took this pic under a light bulb:


The holo in this polish is amazing, as it is in the rest of the two halo hues collections. I love these polishes!!

Anyway – let the dotting begin.

I dotted in this order:

OPI: You only live twice – a lovely shimmery red
Essence 50’s Girls reloaded: Ahoy! – Plain white white crème
China Glaze Holographic: Astro-Hot – from the Hologlam collection.
Essence: Black is Back. An ordinary black crème

I topped it all with a generous layer of HK Girl topcoat, and here’s the final result:


The photos are still taken under a light bulb. It’s not always that the sun in cooperative. I can assure you that the holo went crazy under the sun the day after!


And one final shot:


Here are the pretty polishes I used:


I am really pleased with this, and so happy that I decided to go for that design again. I really like the way that the dots build up with the various colours. 

Please let me know what you think of this in the comments below.

Thursday, August 8, 2013

Lynnderella ~ Opal Intuition


Lynnderella ~ Opal Intuition  
Pink, purple and iridescent multisized and multishaped glitter in a clear base

So, here’s my second Lynnderella ever. This glitter is right up my alley and can spice up pretty much ever imaginable mani.

To prove it, I have tried this over two different polishes.

First I want to show it over a purple. I used Femme Fatale Twilight Meteorite, which I showed you here.  It’s a seriously pretty purple packed with glass flecks.

And here’s what happens when I dab a layer of Opal Intuition over it, and seal it up with a layer of Poshé topcoat:


Isn’t that just dreamy and beautiful?


The iridescent glitters changes colour after how the light hits them. It’s so pretty.


I like this! I’d even wear this for a wedding!

Sometimes I’m more in the mood for a bit more edge, so I also tried it with a blood red polish underneath. I chose Manglaze “Fatty’s got more blood”, which is a dark red matte polish. I showed it here. Again, I dabbed on a layer of the Opal Intuition, and sealed it with a layer of Poshé topcoat.

The dark underwear gives this polish a totally different expression! It’s almost as if it wasn’t the same topper. Let me show you what I’m talking about: 


 The glitter polishes stand out more this way, and the look gets less girly.


The amount of glitter on each nail is from one dip in the bottle – I’m quite pleased with that.


Verdict:
This is a favourite glitter! It’s usable for almost every colour imaginable – I’d even try it over a teal next time. It dries pretty fast, and I only needed a generous coat of Poshé to smooth out the glitter. I found that I needed to dab the glitter on to get the glitter spread out evenly, but that’s pretty normal for glitters like that, so it’s not a problem, but just the way it is.

So yes: I’m also very pleased with my second ever Lynnderella!


Opacity: -/10
Colour, prettiness: 10/10
Durability: 9/10
Value for money: 9/10
Overall: 9.5/10
Buy again: Yes

Wednesday, August 7, 2013

P2 ~ 020 Lovesome


P2 ~ 020 Lovesome
Dark rose textured with golden shimmer

Textured polishes are a hit at the moment, and lots of polish producers are coming out with series of them. P2, which is a German brand sold exclusively in the German drug store DM, is no exception. I’ve bought three of the five in the series, and this is the first one I’d like to show you.

The formula is really good and the polish spread out easily. Pigmentation is great – it basically covers in one coat. I gave it two – to achieve the desired look and texture. The polish dries quickly between coats, which is always a plus in my book.

Here’s what it looks like in ordinary daylight:


The polish is a tad too golden for what I usually like, but there are ways to fix that.


I wanted to break the golden look with some nail art. I was going out, so I didn’t have time to make something really fancy. I went for two black stripes on each nail, and I used an ordinary black striper polish from Claire’s.


I topped it with a layer of Poshé topcoat, and it only smoothed out a bit of the textured effect.


The topcoat did however also make the glitter pop more, which I really like!


The cool thing about these textured polishes is that they are great quality and cheap at the same time. The not so cool thing is that you can only buy them in Germany.

Are you over the textured trend yet – or have you only just begun? :)


Opacity: 8/10
Colour, prettiness: 6/10
Durability: 8/10
Value for money: 10/10
Overall: 8/10
Buy again: Yes