Wednesday, February 27, 2013

Icing ~ Radio Superstar - on a gradient


Icing ~ Radio Superstar
Clear base with pink and blue glitter and silver stars

I love Icing’s glitters. The ones I’ve got are all amazing, and I am a bit sad that I don’t have easy access to them. Fortunately I’ve been able to get some of them from sweet girls in the US, the Radio Superstar included.

I made a gradient as a base for this glitter. I started out with one coat of Models Own “Snow White” to make a good base for the colours.

Then I used Orly’s “Sweet Peacock” from their “Birds of a Feather” collection from autumn 2011. It’s a beautiful turquoise shimmer. The other polish I used was Essie’s “Jamaica me Crazy”, which isn’t my favourite polish for reasons I don’t quite understand myself yet. But anyway, together with the blue, it made a great gradient. Take a look – I am not wearing any top coat on this pic:


And now for the glitter! I didn’t want the glitter to take over this gradient completely, so I painted some glitter on the tip of a sponge, and then dapped the glitter on. I fished around for the stars, so I gots me a star on each ring finger and on each thumb. I finished the mani with a layer of NYC Turbo drying top coat:


And here it is from a different angle:


The pretty polishes:


I love gradients, but I don’t like the cleanup afterwards. I tape my nails, and that definitely helps, but there is always something left to clean up anyway. I use an angled brush and pure acetone, but it’s as if the more I clean up, the more abused my cuticles look. And if it’s a persistent polish I’ve sponged with, then my cuticles end up looking as if a dog chewed them! If any of you girls have got a bit of advice for me about cleanup, then I shall be forever grateful!!

But anyway, back to the mani! I’m utterly pleased with this; I seriously love that glitter! What do you think? Would you have used different underwear for it – or perhaps none at all? Please do share your thoughts in the comments below! 

Tuesday, February 26, 2013

Color Club ~ Ulterior Motive with dots


Color Club ~ Ulterior Motive
Magenta with blue and pink shimmer

Ulterior Motive is from the Alter Ego collection from spring 2011. It’s a delicious vibrant magenta, with the most gorgeous blue and pink shimmer. It’s a really pretty polish.

Furthermore it’s got a really, really, really nice formula, like most of my other Color Clubs - which is one of the reasons why I like the brand so much. I used two coats as the base for this mani. Drying time between the coats was pretty fast.

Here’s what the two coats, without top coat look like:


Then I added a thick stripe down the middle of the nails. I used Isadora’s North Star from their Holiday collection Northern Lights from 2012. I just used the brush to dab the stripe on. I added two layers in order to make the stripe relatively opaque.

Here’s that step:

 
I’m not quite sure if I should have stopped here. My idea was to dot on the silver with Ulterior Motive. Unfortunately I changed my mind and ended up dotting with black. I personally think it was a mistake, because I didn’t make the dots small enough, leaving them way too dominant for my likings. It’s not the polish’s fault though, only mine.

I sealed the mani up with two coats of BK top coat:


And one final pic of the finished mani:


The pretty polishes:


I must admit that I don’t really know why I bought the Isadora silver glitter. I have so many silver glitters that it’s almost ridiculous. It’s a nice polish though, so perhaps it gets to stay. Although that means I’ll be looking closely at the others, and will prolly make another one go instead ;)

What do you think, girls? Should I have stopped before the dots, or what?

Monday, February 25, 2013

Accessorize and Isadora - in black and grey tape mani


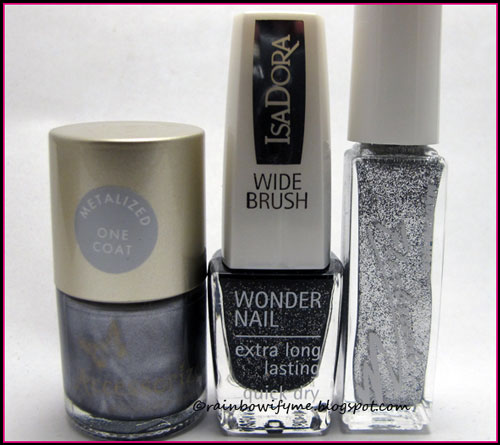
Accessorize ~ Lolite  
Metallic silver with a purple tone
&
Isadora ~ Black Galaxy
Black with holographic glitter

Today I have another one of my tape manis for you. I started out with a polish which I got in a blog sale, namely Lolite from Accessorize. It’s a metallic silver, but with a purple/mauve-ish undertone. It says on the cap “Metalized – One coat”, and that is actually true. It is indeed a one coater, and an easy one to work with too! Drying time is good. The only downside is that it reveals every imperfection on your nails, but nothing that a good base coat can’t fix :)

Here’s one coat, no top coat:


You should be able to see the mauve undertone on that pic!

I waited until I was absolutely sure that my nails were dry before I taped them diagonally across and painted the “bare bit of nail” with Isadora’s Black Galaxy. It only took one coat to make it look good. I love black polishes with a little extra added to them, and the holographic glitter does wonder for this black.


I striped the line between the two polishes with a silver glitter striper from Flexbrush. Apparently it hasn’t got an actual name or number. Then I topped it all with two coats of BK top coat, and my mani was done:


Here are the pretty polishes lined up:


This is a design that I really like. It’s simple and looks so different depending on the colours you use. I think this black and silver grey look is totally awesome – but what do you think? Are you also into tape manis?

Saturday, February 23, 2013

Divage Chic and Ja-De - From Russia


Divage Chic ~ 1714  
Deep burgundy crème
Ja-De ~ 355 Celestial  
Iridescent glitter in a pink base

Today I’m going to show you two polishes I received in my first swap with sweet Anastasia from Little World of Coloured Nails. They’ve been sitting in my box of untrieds for too long already – so now it’s time for them to shine!

I started out with two coats of Divage Chic 1714, which is a rich and very delicious burgundy. The formula was great and very easy to work with, and the drying time was fast. I like that a lot in a polish.

Two coats, no top coat:


It leans a bit towards brown, so I decided to spice it up with a bit of iridescent glitter. I used Ja-De 355 Celestial, which is also from Russia (with love, obviously :D). The glitter applies easily; no need to dab the brush around to spread it. The drying time was a bit slower than the Divage, but still on the normal side. I only applied one coat of the glitter:


Here’s a shot from a different angle to show you all the colours this glitter flashes:


I enjoyed the look of this for a little while, as I trying to figure out what to do with it. I ended up with stamping, because I have got a lot of stamping plates from Gals that I haven’t tried yet. I settled for GA30 from the Fairy set, and I used a white no name stamping polish. And I sealed the whole thing up with my faithful Poshé top coat.


This design is much more tribal than it looked on the actual stamping plate, but I like it. I also like that the design is only on half the nail.


Here are my pretties:


So, the burgundy crème is another win from Divage, and this time with the bonus of drying super fast. The Ja-De is indispensable for all glitter lovers, it can spice up any manicure in a rush. So a double Russian win today, don’t you think?

Friday, February 22, 2013

Color Club ~ Secret Agent with Mohda glitter

Color Club ~ Secret Agent
Vibrant silky frosty purple

Secret Agent is from the Alter Ego collection from spring 2011. I bought the entire set, and since I have so many purples, I just really wanted to try it on and then find a new home for it. But - after having tried it on, I have actually made the decision to let it stay here for now.

The formula is a bit thick, but the polish applies easily and almost non-streaky. Drying time is fast, and this could be a one coater. I almost went with one coat, but decided to add another, just to make sure to give the polish the best conditions to be pretty. The polish is frosty but it still dries up with a silky surface. A great polish, even for girls with many purples ;)

Here’s what two coats and no top coat looks like:


Then I taped my nails and applied a coat of Mohda “Ametista” which is a paler purple with holographic glitter in it. I am sure that this is opaque enough to just take two coats to build up to full opacity, but today I used it for layering. It’s a polish I got from the sweetest girl in Brazil.


I removed the tape while the polish was still wet, and then I covered up the line between the two polishes with Essence’s striper “04 Pink !”. And I finished my mani with a coat of BK top coat. 


Here is a picture of all the polishes I used:

 
I’m liking this myself and hope you do too! Wouldn’t you let Secret Agent be a keeper?

Thursday, February 21, 2013

Flormar 38 and 39 in a stripey glitter gradient

Flormar Supershine ~ 38 and 39
Fuchsia with purple glass flecks and silver glitter with bits of holo glitter

I bought these two Flormar polishes in Germany on my most recent trip there. I decided to use them for a glitter gradient with striping tape effect.

I started out with three layers of #38, the fuchsia. The formula was a bit on the thin side and drying time was a killer. It took three dreadful coats before it was relatively opaque. Yaaarrrgh! Had it dried faster, I would have added a fourth coat, but I simply didn’t have the patience for that. So, three coats, and then Sally Hansen Dry Kwik, which is a liquid that makes the polish dry faster.

Here’s what three coats of #38 looks like, without top coat:


This is the first Flormar I’m not satisfied with. I’ve never experienced that lack of pigmentation and that long drying time. If this had been my first Flormar, it might well have been the last. Fortunately I tried some of it’s cousins on first! :)


Then I put on three bits of striping tape on the tip of each nail and sponged a gradient over it with #39. I removed the striping tape while the polish was still wet. I think striping tape can be a bit of a struggle to work with, so I did one nail at the time, in order not to get striping tape all over! :D


I finished my mani with a layer of NYC Fast Drying top coat, and here’s how it ended up looking:


And another pic:


The glitter gradient makes this rock in my opinion, so #39 gets to stay in my collection. I’ve already found a new home for her sister, #38.


Do you like the stripes in the gradient? Or it is too much? 

Wednesday, February 20, 2013

Nails Inc 3D glitter ~ Connaught Square


Nails Inc 3D glitter ~ Connaught Square
Vibrant blue glitter with purple glitter

This post is special, because it features a polish all by itself! <gasp>

Connaught Square is a lovely blue glitter with purple glitters added to it. The blue is the dominant colour. The formula was a bit tricky to work because it’s all glitter. The brush is wide and tends to pick up too much polish, so it’s important to wipe off a lot of access polish before actually painting the nails with it. Oh, and the polish stinks by the way, really stinks. Not even Kleancolor’s polishes smell as bad as this one does. But I sat through two layers of the smelly glitter.


The glitters are easy to spread out, which is pretty normal for glitters like these. It dries up gritty, and even two generous coats of nice thick Seche Vite top coat couldn’t fix that little problem. I don’t mind a bit of texture, but if you do, you should be prepared to add lots (and lots) of top coat to this polish.


I wondered why they call it a 3D glitter, but after having looked at it in different lighting, I understood why. The blue glitter is prominent, and in low lights and certain angles you only see the blue. But a little twist of the fingers, and the pretty purple suddenly reveals itself. It’s almost magical!


I wore this alone. I didn’t have the heart to add anything to it. But seriously – it felt weird to wear a polish all by itself again! :D

Note: It’s a real struggle to get this off the nails again. Tip: Use the foil method! :D


Opacity: 6/10
Colour, prettiness: 7/10
Durability: 9/10
Value for money: 6/10
Overall: 7/10
Buy again: No

Tuesday, February 19, 2013

Fire Gradient


Fire Gradient

I wanted to try and make a fire gradient.

I started out with Sally Hansen X-treme Nail wear’s “Crushed”, which is a bright, shimmery orange. It was a really easy polish to work with, and drying time was average. I gave it two coats, and it looked like this:


Then I used a eyeshadow applicator to sponge on some red for the depth of the fire. I used Astor #25, which is a deep red with a golden shimmer. Perfect for this type of mani in my opinion.

Here’s that step: 


Then I stamped the flames on. I used stamping plate DRK-B and a black no name stamping polish. I don’t have pictures of that step, sorry! :)

I finished my mani by adding a layer of Nubar’s flakie “2010”, which really added something to the flames. I love the sparkle of these particular flakies.


I must admit that I like it way better on the pictures than I did in real life. I need to try out some other stamps of flames, but I’m not totally convinced that I like these ones. 


Here are the polishes I used:


This was a learning experience to me, and not my best work, but not the worst either.

Have you ever done a flame mani? If yes, please link me to it in the comments – I’d love to see it!

Monday, February 18, 2013

Severina 3D ~ 310 and Catrice ~ Blue Cara Ciao


Severina 3D ~ 310
Lavender holo

Meets:

Catrice ~ Blue Cara Ciao  
Vibrant blue crème

I couldn’t decide whether to do stripes or dots today, so I ended up doing both!

I started out with a polish that I got from sweet Anastasia from Little World of Coloured Nails. It’s Severina 3D #310. It’s a holographic polish, and it’s a mix between pale lavender and silver. The holo isn’t the strongest I’ve seen, but it’s definitely there, and the polish is also pretty when the sun doesn’t shine on it, which is a huge plus in my book!

Here’s how two very easy and fast drying coats look like – there’s no top coat on yet:


Then I cut out thin stripes of masking tape and masked my nails down the middle. I applied one coat of Catrice’s Blue Cara Ciao and removed the tape while the polish was still wet. Blue Cara Ciao is an amazingly beautiful blue; I don’t think I’ve ever seen such a vibrant blue before.

When the blue was dry, I covered up the line between the two polishes with a black striper from Claire’s, and then I dotted on the same blue polish on the holo line down the middle of my nails.

One coat of NYC Fast Drying top coat completed my mani:


And from another angle:


Here are the polishes, I used:


I love this! It’s fun and eye catching, and still relatively easy to do. The most difficult thing was actually to cut out the stripes of tape :)

What do you think? Is it cool or not cool?

Sunday, February 17, 2013

Catrice ~ George Blueney with holo stamping


Catrice ~ George Blueney  
Dark blue with blue and purple shimmer

Meet Mr. George Blueney, a deep, dark, handsome stranger!

I love Catrice polishes. They’re usually well pigmented, easy to apply and fast drying. Mr. Blueney is no exception. I applied two coats, even though one might have been enough. The shimmer is fantastic. It doesn’t show it’s purple side much, but the blue… oh wow!

Here’s what two coats look like, no top coat:


I stamped on it, using a Kiko holo with number 399, called Silk Taupe. I don’t think I am going to use this polish on it’s own, so I thought I’d give it a go for stamping. And it works!

I used the stamping plate from Cheeky CH11, and stamped all my nails with the same pattern. I topped it up with BK top coat, which was so kind as to not smear my design. BK, I thank thee :D 


It actually reminds me of tortoise shells, even though the base colour is blue and not green or brown. I think it is pretty cool.


Here are the two polishes, I used:


What do you think of stamping with holo polishes? Cool or not cool?
I can’t wait for the sun to come out and play soon!


Opacity: 8/10
Colour, prettiness: 7/10
Durability: 7/10
Value for money: 8/10
Overall: 7.5/10
Buy again: Yes

Friday, February 15, 2013

Color Club ~ Angel Kiss - with holo stars


Color Club ~ Angel Kiss
Pale green strong linear holographic

Angel Kiss is from Color Club’s Halo Hues collection from winter 2012. It is a series of 6 polishes, of which I bought three. This is the first one I’ve tried on, and I am amazed! Wow, what a holo!!

I have written in my description that it’s pale green, but when I look at it, it’s definitely blue.

The polish glides on easily over a regular base coat. I only got problems with dragging when I tried to correct minor flaws in application, so - don’t do that. Correct what needs to be fixed with layer number two. It was almost perfect after the first coat, but the second coat it’s just fantastic!

No more words to describe it, just this pic, taken under a light bulb. The sun is not willing to show its face at the moment.


Now for the fun! I taped my nails diagonally and painted the tips with Pop Beauty Nail Glam’s “Poetic Peacock”, which is a dark teal packed with shimmer. It’s a beautiful polish, which I’m going to play more with later!

Here’s that step: 


Then I stamped on the tips. I used Angel Kiss as my stamping polish, and stamping plate M3 from Konad. And now I’ve got little holo-stars on the tips of my nails!


Whoa, I really dig this effect!


It’s definitely not the last time I stamp with Angel Kiss over a dark polish, I think this looks amazing!


And here are the two polishes in my light box. The holo effect doesn’t show itself in there.


How do you like this? Is this cool or what? I’m really proud of it myself!


Opacity: 9/10
Colour, prettiness: 10/10
Durability: 9/10
Value for money: 10/10
Overall: 9.5/10
Buy again: Yes

Thursday, February 14, 2013

Milani ~ Blue Flash - with stripes


Milani ~ Blue Flash
Blue glitter!

You know these polish brands that promise a lot? Like: “No chip in 10 days”, “Dry in 30 seconds” and stuff like that. I hate that, because it never seems to apply to me. So I must admit that I was a bit sceptical when I bought Milani’s “Blue Flash”. It said “One coat glitter” on the bottle. But I thought: what the heck – it’s a pretty blue, and I don’t mind applying a couple of coats.

Little did I know that they actually meant what they said! Girls, I applied one coat of the glitter, and it covered! The brush was a little bit fat from being loaded with glitter, but it was easy to apply anyway. Here is what one coat of Blue Flash looks like, without top coat on:

That’s pretty good, isn’t it?

I would obviously apply a top coat if I had in mind wearing it like this. But you should know me by now. I hardly ever wear just one polish. I had stripes in mind for this baby.

I used a silver striper from Claire’s and a purple striper from L. A. Colors’ series “Art Deco” called Vibrant. And then I just started painting my stripes:


First I painted all the purple stripes, and then the silver stripes next to them, leaving a stripe a blue visible between them.


Isn’t this looking good? It reminds me a bit of pyjama wear :D I wear two coats of NYC Fast Drying top coat over this.

Something weird happened with the purple striper. After having made stripes on 7 nails it then started to get horribly stringy and hard to work with. I tried to give it a good shake up, but it kept being stringy, so I’m definitely unable to recommend this particular striper!

This is how it looks when I pull the brush up:


And here’s the bottle shot:


I am really pleased with this! Do you like it too?

Opacity: 10/10
Colour, prettiness: 8/10
Durability: 9/10
Value for money: 9/10
Overall: 9/10
Buy again: Yes