Showing posts with label Brand: Pretty Serious. Show all posts

Sunday, January 17, 2021

Pretty Serious: BSOD

Pretty Serious: BSOD
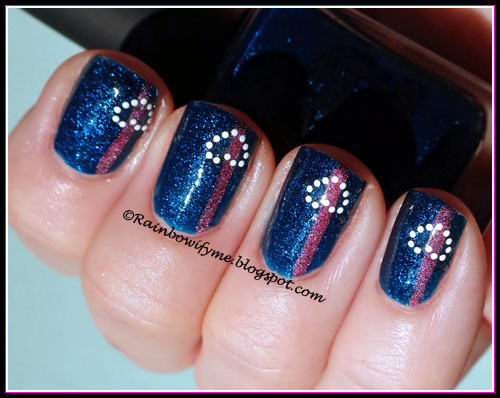
Blue jelly with blue square microglitter


BSOD means Blue Screen Of Death and that is something computer users don't really want to see. BSOD is from 2012 and it's from the Hello World-Collection.

The formula is really good and so is the coverage. I used two coats for full coverage. Girls with longer nails might need a third coat of polish but two coats was enough for me. The drying time is good.

I made a magenta stripe down each nail with a striper from Moyra. Then I placed a sticker on each stripe - the sticker has the shape of a heart.

Here's the end result including a layer of topcoat. The photo is taken in the sun.

Pretty Serious: BSOD


Look how pretty the blue is!

Pretty Serious: BSOD


Here is BSOD alone; two coats and layer of topcoat.

Pretty Serious: BSOD


And these are the things I used today.

 BSOD is really beautiful, and I love the glitter in it.


Number of coats: 2
Drying time: Good

Finish: Jelly with microglitter squares

Overall impression: Great formula and coverage, beautiful glitter
Buy again: Yes

Sunday, January 5, 2020

Pretty Serious ~ Steve


Pretty Serious ~ Steve
Hot pink shimmer

Hot pink is a great colour, which I like a lot.

I want to write that the formula of "Steve" is good and it almost is. It's definitely workable, but it does act a little bit up if you don't work really fast. It wants to dry up streaky but you can end up with a really good result if you're careful. I used two coats for full opacity. The drying time is really good.

The flowers on my nails are water decals and I topped that with the holo glitter topper "Northern Lights" from Out The Door.

This is the end result.

Pretty Serious ~ Steve

Isn't this just pretty?

Pretty Serious ~ Steve

Here's "Steve" alone; two coats and no topcoat. You can see on my ring finger that "Steve" acted up a bit and ended up a little bit streaky there.

Pretty Serious ~ Steve

These are the things I used today.


I really like Steve, I think it's a really pretty colour and I like the shimmer.


Number of coats: 2
Drying time: Really good
Finish: Shimmer
Overall impression: Great colour and shimmer. Not friendly for beginners :D
Buy again: Yes

Saturday, September 16, 2017

Pretty Serious ~ The Pink One


Pretty Serious ~ The Pink One
Shocking pink with blue shimmer

I was in the mood for pink today – but not just any pink. It had to be a pink with wow-effect, and I knew exactly which polish I wanted to wear: Pretty Serious’ “The Pink One”. It’s a gorgeous shocking pink packed with blue shimmer – it’s an amazing polish for sure.

It’s been four years since I featured it last on this blog so I think it’s time for it to shine again. You can check out my old post if you’re in the mood for it too, haha! :D

I used two easy coats for my manicure. The formula was really good and the drying time is pretty average.

I topped it with a holographic silver glitter from Alix Avien with the number 110. I stamped some stripes on it too. The stripes are from Lina’s stamping plate Make your Mark! 01, and I stamped with Colors by Llarowe’s stamping polish Turq’d.

Here’s the final manicure including topcoat:


Isn’t that the beautiful!? It’s as bright and blingy as I wanted it to be.


This is The Pink One on its own: Two coats and no topcoat. I love this polish!


Here are the three polishes and the stamping plate I used.


The Pink one is really amazing, I love it. It’s also one of the few polishes I actually got a backup bottle of!


Number of coats: 2
Drying time: Average
Finish: Shimmer
Overall impression: Great formula, fantastic colour and shimmer.
Buy again: Yes

Sunday, August 9, 2015

Prettypots and Pretty Serious


Prettypots and Pretty Serious  
Orange and blue in sweet harmony

I bought these two beauties from Norway Nails recently and decided to wear them together. Orange and blue? Yes, why not!

First two coats of Pretty Serious’ “My Darlin’ Clementine”. It’s a lovely shimmery orange. It’s been a while since I bought any polishes from Pretty Serious, mostly because the last many collections haven’t called my name. I used to be a huge fan, but yeah, it fades a bit when there’s far between collections that you actually like, doesn’t it.

Anyway, My Darlin’ Clementine isn’t new, but I have been eyeing it for a while.

When that was dry I added the blue in shape of PrettyPots’ “You’ll never take my Sky”. It’s a great blue linear holo. I added it with a striper to get this design:


There’s also a layer of topcoat involved.


I like the mix of shimmer and holo a lot.


I know this isn’t perfect but I really like it anyway. What do you think?


Number of coats: 2
Drying time: Good for both
Finish: Shimmer and linear holo
Overall impression: I love them both
Buy again: Yes

I bought both these polishes from norwaynails.com.
You can find more info on NorwayNail’s Facebook page, link here.

Norway Nails have kindly offered my readers a 10% discount code. Just use the code RAINBOWIFYME10 at checkout, and you'll be getting 10% off your purchase.
Sunday, September 21, 2014

Pretty Serious ~ Elliot


Pretty Serious ~ Elliot
Sky blue crème with microflecks

Here’s a short post to show you a couple of polishes from the infamous box of untrieds. I was in the mood to do something else than just swatching so I started out with a layer of OPI’s Angel with a Leadfoot, which is a plain white crème. When that was dry I sponged Pretty Serious’ Elliot on the tips. I used a ragged sponge because I wasn’t after a clean and neat result.

Here’s what that step looks like in the sunshine:


I reckon that if I had used yellow/orange/red this would look like fire! Now it’s just ice :D


When it was all dry I applied a layer of Misa’s New Star, which is a clear base with blue and lilac glitter in various sizes. It made the mani “come together” more, if that makes sense. If not, just take a look, and you’ll see what I mean:


These pictures are taken in the lightbox because the glitter all looked black on the sunshine pictures. And there’s no black glitter in New Star at all!


I quite like this mani, which can be made with all sorts of colours. It’s simple and easy and it doesn’t take a long time. I like that.

Wednesday, April 9, 2014

Something about Rainbowify Me


I joined a nail art group recently. The purpose was to be challenged  polish and nail art wise. Unfortunately I felt I had to leave the group before it even started. I had already made the first mani though, and there is no reason why I shouldn't share it here on my blog anyway. The first challenge was "Something about #insert blogger name here#"


So here goes:


My love for polish started many years ago, in my early teens. I have always loved shiny things and things that glitter.

I’m not into dull colours, I like it when the colours really pop. Nature is amazing when it comes to colours, and some of the most beautiful things that never fail to amaze me are rainbows. So once I finally got into blogging 2½ years ago, it wasn’t hard for me to chose a blog name: Rainbowify Me.

Call me Captain Obvious: I chose to make a rainbow mani.


 I used 8 different polishes for this mani. I started out with OPI Alpine Snow. I only applied one coat, because all the other colours cover really well in themselves.


I tried the method of masking around the nail with peel-off base coat, even though my earlier attempts hadn’t worked that great. I tried with Isadora’s peel-off basecoat this time and it worked somewhat more successfully, even though I find it really tough to make the peel-off stuff cover the cuticles without touching the nails.


I love gradients, but I am so bad at the cleaning up part afterwards, so I really want to figure out a way I can get around the clean up thing.


Here are all the polishes I used:

OPI: Alpine Snow. Sally Hansen Insta-Dri: Just in Lime!, Lightening & Orange Impulse. Pretty Serious: Santa’s Sunburn & Into Dreams. Essence: I’m a Marine Girl. Orly: Shine on Crazy Diamond
Which kind of mani would you have chosen to make?

Tuesday, March 4, 2014

Pretty Serious x 3


Pretty Serious x 3
A variety of prettiness

Today I want to show you three different Pretty Serious polishes that have been sitting in the box of untrieds for a little while. Today is the day where they are going to shine!


Let’s start with Creature Crush, an almost black jelly base with large black and silver holographic hex glitter.

The formula is good and easy to work with, and the glitter spreads out easily. Drying time is good, no worries in that department. I applied a layer of topcoat before taking these pictures.

Here’s two coats + one layer of topcoat:


Usually I’m not that much into black polishes, but all the glitter makes me really like this.


It’s like a beautiful night sky isn’t it?!


Verdict: This one is a winner! I’ve come to like Pretty Serious’ polishes so much that they’re on my top three list over indie polishes I like the best.


Next one up is Crystal Lake. That’s a blue base crammed with blue glitter in various sizes.


I must say that the formula was quite a challenge! This is the first time I’ve really experienced that with a Pretty Serious! The base was so packed with glitters that it was difficult to spread it out evenly. It took three coats before this was opaque, and the drying time between the coats became slower and slower.

Here’s three coats + a layer of topcoat:


And a slightly brighter pic:


One last picture. It is a pretty polish after all!


Crystal Lake comes with a warning:
Warning: We take no responsibility for any possible bloody mishaps that may occur while drinking, doing drugs or having pre-marital sex while wearing this polish.

O_o

Verdict: I won’t use this polish on its own again, it is to thick for that. It’s a really cool glitter, but next time I’ll be wearing it over a similar blue, and then with just one coat of glitter over it. Plus, if it interferes with my drugs, drinking and pre-marital sex....*shrugs* (anyway – I prefer extra-marital, myself).


Last one for today is Liquid Leprechaun. That’s a green jelly base with multi sized golden and green glitters in it. Do you want to know how it’s made? Here goes:

Not all leprechauns are cheerful little Irish fellows waiting to have a pint of Guinness with you at the end of the rainbow for St Patrick's Day! Most are fearsome little munchkins that are looking to get you for stealing their pot of gold! So we threw a bunch of them in the blender and made some nail polish...

The formula is great, I had no problems with application at all. It took two easy coats to make it opaque and the drying time between the coats was average.

And girls, this is a must have if you’re into radioactive looking greens!

Take a look at two coats + a layer of topcoat:


I’m impressed. I’m not even into golden polishes but this is gorgeous!


Here’s a slightly blurred pic to show off the holo glitters.


Verdict: Yes please! I love everything about this polish! Win, win, win!

Buy again: Yes


I bought these polishes on norwaynails.com.
You can find more info on NorwayNail’s Facebook page, link here.

Norway Nails have kindly offered my readers a 10% discount code. Just use the code RAINBOWIFYME10 at checkout, and you'll be getting 10% off your purchase.