Showing posts with label Brand: Lacquester. Show all posts

Thursday, April 23, 2020

Lacquester: Dragon Shield


Lacquester: Dragon Shield
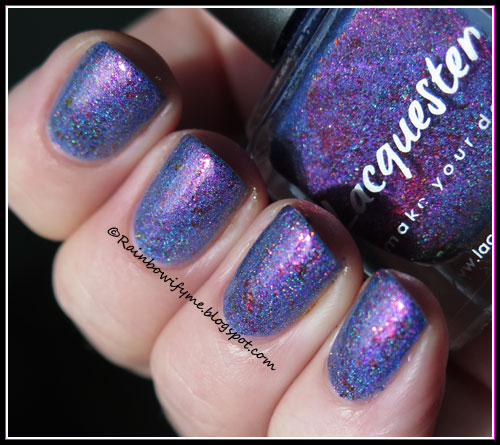
Blue base with bronze/copper/gold/red/fuchsia and green UCC flakies

"Dragon Shield" is a Facebook custom that came out in 2016. It's a really spectacular polish - it has got so much going on. I haven't worn it before now though, mostly because I can't help but thinking that this polish is mostly brown/copper - colours that aren't one hundred percent mine. Today I'm wearing it to find out whether I'll keep this polish or not.

The formula is good. I used two easy coats for my nails today and the drying time was really good.

I added a golden nail stud by the base of each nail.

This is what "Dragon Shield" looks like in daylight.

Lacquester: Dragon Shield

Here's the same thing photographed with flash. This actually shows that the base is blue.

Lacquester: Dragon Shield

Here's "Dragon Shield" alone; two coats and no topcoat. The photo is taken in daylight.

Lacquester: Dragon Shield

And here's "Dragon Shield" alone again; two coats and no topcoat. This photo is taken with flash.

Lacquester: Dragon Shield

Here are the things I used today.


"Dragon Shield" was limited edition and is no longer available. Like I said: The colour isn't completely me, but I think I'm going to keep my bottle anyway because I do actually think it's really pretty.


Number of coats: 2
Drying time: Really good
Finish: Holo and flakies
Overall impression: Really nice effect and good formula
Buy again: Yes

Thursday, September 20, 2018

Lacquester ~ Tulipazuli


Lacquester ~ Tulipazuli
Blue holographic base with tons of color shifting pigment and multichrome flakes

“Tulipazuli” was a part of the Holo Hookup box for April 2018. The theme of that box was “Tulips”. I’m going to show you all four polishes in the box over the next couple of days, and I’ll link to each post at the end of each blog post as I publish them.

The formula of “Tulipazuli” is really good and I used two coats for full opacity. The drying time was good.

The subtle stamp is from the stamping plate BP-L060 and I stamped with a baby pink stamping polish with shimmer; also from Born Pretty Store.

This is the end result in the sun. Look at those flakies!

Lacquester ~ Tulipazuli

This photo is taken in the lightbox.

Lacquester ~ Tulipazuli


Here’s “Tulipazuli” on its own; it’s two coats and no topcoat yet. The photo is taken in the sun.

Lacquester ~ Tulipazuli

Here are the things I used today.


“Tulipazuli” is a really cool looking polish because of the interesting finish.

Links to the other polishes in the April 2018 Holo Hookup box:

Different Dimension: Tulip Mania


Number of coats: 2
Drying time: Good
Finish: Holo with shimmer and flakies
Overall impression: Good quality polish. Formula is good and I love the finish
Buy again: Yes

Friday, July 7, 2017

Miss Sporty ~ 466


Miss Sporty ~ 466
Orange with very subtle pink shimmer

Today’s post isn’t going to be a step by step post because I wasn’t in the mood for that – so I didn’t take photos as I finished each step like I usually do.

But I’m still going to talk you through the steps; it is a blog after all, and I do use my blog posts as reference when I run across an already tried polish.

So: I used two layers of the orange Miss Sporty. The drying time was average.
Then I applied a layer of Lacquester’s holo topcoat: Holo Dek 14-35. It’s not my favourite holo topper because it greys the base colour quite a lot, even after one coat.

Then I stamped on it. I used my new stamping templates from Born Pretty Store so I could get a triangular stamp on each nail without using tape. The motif is from Lina’s stamping plate Make Your Mark 04; it’s various sized letters. The stamp didn’t work really well. I am not sure whether it was the template’s fault or if it was the stamping polish from El Corazón “Blue Neon” that didn’t quite work with the stamper; but the result wasn’t amazing.

I made two stripes on each nail to frame the stamped pattern.

This is the final mani, including a layer of Moyra’s stamping topcoat.


These two pictures are both taken in the morning sunshine.


Here is the stuff I used. You can see the triangular template in the bottom left corner of the picture.


Hm. I would have liked this way better if the stamp had come out crisp and clear.

Number of coats: 2
Drying time: Average
Finish: Very subtle shimmer
Overall impression: Fun polish, I like the colour
Buy again: Yes