Tuesday, September 9, 2014

Color Club Poptastic Neon 2014 collection


Color Club Poptastic Neon 2014 collection
swatches

I was happy to see Color Club release a neon collection, because I think there’s been quite a few misses in Color Club’s collection recently. I’m a fan and there are so many collections I have given a miss to because I didn’t find them interesting enough. But neons? Yes please. There are six polishes in the collection and I bought four of them.

I started out with the neon yellow, Not-So-Mellow Yellow. I’m usually not into yellows, but I had to try out this highlighter yellow. Application was difficult and I applied three coats before I was just vaguely satisfied. The polish is pretty self levelling though so it looked better and better as it dried up.

The sun wasn’t out for this one, so here’s a daylight pic on a cloudy day:


This is like, wow!


Lightbox picture:


And this picture will reveal which colour we’ll be moving on to shortly:


Next one up is Foxy Mama, a traffic cone coloured orange. The formula in Foxy Mama is perfect. I used two easy and self-levelling coats for my swatches.
The sun came out to play, yay!

Two coats, no topcoat:


The shimmer in this one is just amazing!


I love oranges like this one!


Try and guess which colour we’re moving on to :D


Kapow! is a neon pink with a slight purple shimmer. Same great formula as Foxy Mama, and again, two coats for the swatches.


Oooh yes, what a lovely pink!


I’m impressed, really impressed.


Another hint to which polish I’m moving on to:


Right On, which is a bright purple with purple/blue shimmer. Great formula, self-levelling and nice to work with. And again, two coats here.


It’s hard to pick a favourite of this bunch, but this on might be it.
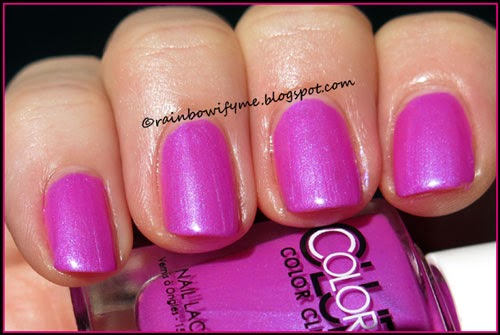

Mmm… I love the fact that there’s shimmer in them all.


And since this is the last of four polishes I bought, this is not a hint to what we’re moving on to, but simply a picture that completes the circle.


Verdict:
This is a great neon collection and I’ll definitely recommend you to buy it if you’re into neons! They have great formulas, the only one that was a bit difficult to work with was the yellow. It’s definitely workable though and that shouldn’t hold you back. It is a yellow after all!

Polished thumbs up from me!


The two polishes I didn’t buy are Bell Bottom Babe which is cobalt blue (my musicologist BF points out that this is a nice reference to Eric Clapton’s ‘Bell Bottom Blues’, flip side of the original ‘Layla’ single. I think he’s just too smart, and they don’t even know that song exists haha) -  and Peace, Love & Polish which is pink with a coral tone.  

Monday, September 8, 2014

Magical Music Manis 2: Ebony & Ivory ~ Stevie Wonder & Paul McCartney


Yay, it’s Monday again and time for another Magical Music Challenge. Today it’s an oldie all the way back from 1982, namely Ebony & Ivory.

This song calls for a black and white mani in my opinion, so that’s exactly what I did.

Ebony is a dense black wood, so I stamped trees on my index and my pointer. Ebony has a long history of use, with carved pieces having been found in Ancient Egyptian tombs.


Ivory Is a hard, creamy-white material, derived from the tusks and teeth of animals, so I decided to stamp elephants on my ring finger and my middle finger.


Ivory has many ornamental and practical uses. Prior to the introduction of plastics, it was used for billiard balls, piano keys, Scottish bagpipes, buttons and a wide range of ornamental items. Synthetic substitutes for ivory in the use of most of these items have been developed – which is good, because I don’t like the idea of killing elephants just to get their teeth!


Here are the polishes I used. OPI Angel with a Leadfoot, Essence Black is Back and China Glaze Fairy Dust.


Here’s the video to Ebony and Ivory:


Check out the other girls who participates in this challenge. Would you like to join? Please feel free to!


Sunday, September 7, 2014

Girly Bits ~ Flash your Tips


Girly Bits ~ Flash your Tips
Purple linear holo with green shimmer

Flash your Tips is from A Box In-Died from Llarowe from March 2014. I actually won the entire box in a Facebook giveaway, YAY!

The Girly Bits is definitely the star polish for me in that box, and therefore the first one I’m going to wear. The formula is good, just like I’ve come to expect from Girly Bits, and the polish is really easy to work with. I used two coats for my mani; I did consider a third coat but two did cover well enough. Drying time is pretty good.

Here’s two coats and no topcoat in the sun:


Look at all them purty rainbows!!


Here’s a low light picture. The colour almost shows itself as cornflower blue and the green shimmer make it worth wearing outside the sunshine too.


I stamped on it. I found a swirly motif on the plate Apipila-01 and I stamped with two colours: Sally Hansen “Whirlwind White” from the Insta-Dri series and Bourjois “Bleu Mystérieux”. I mixed the colours on the stamping plate before I stamped. I topcoated it with Poshé topcoat.

Here’s my final result in the sun:


Here’s the same thing in the lightbox:


I was happy to win that box of polishes because I would probably not have bought it myself.


Number of coats: 2
Drying time: Good
Finish: Linear holo with added shimmer
Overall impression: Nice holo, I wish the shimmer was more prominent, because I honestly prefer this polish in the sunshine
Buy again: No

Saturday, September 6, 2014

Dance Legend New Prism ~ #11 High Voltage


Dance Legend New Prism ~ #11 High Voltage
Sky blue linear holo

Today I decided that it was time for High Voltage to shine. I’ve had it for quite a while now and I want it to shine while the sun is still shining. Day are getting shorter here already, and all of a sudden it’ll be autumn with lower lights and less sun. Booo!!! So let them holos shine!

The formula is great and the polish is easy to work with. I used my regular basecoat and experienced no problems whatsoever. It covers well too, I could almost get away with one coat, but the second coat made it all just that tad better, you know. Drying time between the coats is good.

Here it is in the sunshine. Two coats, no topcoat:


Is that beautiful or what? I believe it is!!


Here’s what it looks like in the lightbox. A bit muted but not as dusty and greyed out like I’ve seen other sky blues do. And the rainbows are still there.


I did a bit of freehand art on it. A couple of stripes and some dots and that’s it. I used Coolcos nr. 05 for my freehanding. Here’s my final mani:


A low light picture for you:


Number of coats: 2
Drying time: Good
Finish: Impressive linear holo
Overall impression: Now there’s a nice blue holo that I love!
Buy again: yes

Friday, September 5, 2014

Zoya ~ Monet vs. Essence ~ #23: Million dollar baby


Zoya ~ Monet vs. Essence ~ #23: Million dollar baby
a comparison

It’s been ages since I made a comparison post! So today’s the day where I’m going to compare two iridescent toppers.

Here they are:


Zoya’s Monet is iridescent hexagons in a slightly pink tinted base and Essence’s Million dollar baby is just hexagons in a plain clear base.

Let’s see what they look like on the nails:

From left to right: Zoya – Essence – Zoya – Essence
 
The hexagons are different sizes. The Zoya hexes are smaller than Essence’s hexes. The colour scheme seems exactly the same in the two toppers.

From left to right: Zoya – Essence – Zoya – Essence

The formula is actually quite different. Zoya has a way thicker base than Essence, and even though I usually prefer thick over thin, the Zoya is a bit of a hassle to work with. Essence’s base is thinner, but here you have to fish a bit for the hexes. What you see on the picture is one dip in the bottle per nail.

From left to right: Zoya – Essence – Zoya – Essence

I had to dab the glitters around both with the Zoya and with the Essence. It was easier with the Essence because of the thinner base.

Here’s a bonus picture of the base I layered the toppers over: Golden Rose Rich Color #34. What you see is one coat. Fantastic polish!


Verdict:
The glitters are different enough in size to own both polishes, but Essence’s suspension base is way easier to work with than Zoya’s gloopiness. There’s also the price difference: Zoya retails around $8. I believe I paid around $2 for the Essence. Hmmmm.

If I had to chose only one of them I’d go for the Essence! The ‘six of one, half-a-dozen of the other’ element is overruled by the large price gap.

Thursday, September 4, 2014

Femme Fatale ~ Gentlemen’s Schuffle


Femme Fatale ~ Gentlemen’s Schuffle
Dark teal with shimmer and holo effect

Here’s a polish it took me a while to actually buy. It looked sooo pretty on the pictures I saw that I was sure it was made way prettier on the photos by the dreaded egotistic mani manipulators, than it is in real life. Eventually I gave in and bought it, and girls, I was not disappointed. The polish is indeed just as pretty in real life as it is on all the pretty photos I’ve seen. That’s a huge plus J Let me show you what I’m talking about.

The formula is great and easy to work with. It took two coats to achieve desired opacity and the drying time between the coats is good. I used my regular base coat, coz this baby doesn’t require special underwear.

Here’s two coats and no topcoat taken in the sunshine:


It’s not a secret that I really dig this!


Here’s a light box picture so you can see what the colour really is like.


I paired it with another Femme Fatale: Fatal Attraction. It’s a deep magenta jelly with hologlitter and I showed it in this post last year.  I made a dotty pattern, applied a layer of topcoat, and this is what it ended up looking like:


Here’s a blurry picture, just to show off some bling! :D


And here’s a low light picture:


I know it’s a little bit dark for a summer mani, but I wear what I’m in the mood for no matter what season it is. What about you – do you also wear darker colours in the summer and neons in the winter?


Number of coats: 2
Drying time: Pretty good
Finish: Shimmer and holo particles
Overall impression: This is just as beautiful as shown on photographs. Nice!
Buy again: Yes


I bought my Femme Fatale polishes from norwaynails.com.
You can find more info on NorwayNail’s Facebook page, link here.

Norway Nails have kindly offered my readers a 10% discount code. Just use the code RAINBOWIFYME10 at checkout, and you'll be getting 10% off your purchase.

Wednesday, September 3, 2014

Nail Pattern Boldness ~ Flamboyant & Chatty


Nail Pattern Boldness ~ Flamboyant & Chatty
A couple of swatches

Today I want to show you a couple of Nail Pattern Boldness polishes I bought recently.

The first one is Flamboyant; a purple microglitter mix with accents of green, chartreuse and orange. I wasn’t quite sure whether this was a topper or not, but I found out that this is a polish that works perfectly fine on its own.

The formula is good and easy to work with, the glitter spread out effortlessly. The drying time between the coats is pretty good too. I used two coats and that’s what it took to make it look great!

Here’s what Flamboyant looks like in the sunshine. Two coats and a layer of topcoat:


The mix of glitters is just brilliant! I love the accent colours.


I love the shine!!


Here’s a picture taken in my lightbox so you can see all the colours of glitter better.


This picture is just for fun to show off the glitterness! :D


It was my intention to give this a post of its own. I wanted to do a tape mani, but as I removed the tape from the first nail I also removed the polish underneath it, dagnabbit!!! So I took it all off and decided to show you Flamboyant’s sister, Chatty, now we’re at it.


Chatty is a cornflower blue microglitter mix with accents of fuchsia and purple.

She’s got the same nice formula as her sister, same coverage and drying time, no worries to report whatsoever! Let’s get right down to it.

Chatty: Two coats and a layer of topcoat:


Some of the purple accents look black in the sunshine, but that’s an optical illusion. There’s no black in Chatty.


Look how she shines!


The lightbox picture that shows you the fuchsia and purple accent glitters.


Verdict:
I’m really glad I bought these two beauties. I especially like that they work on their own. The mix of glitters is really good, I like them both!


Number of coats: 2
Drying time: Pretty good
Finish: Microglitter
Removal: I’d recommend the foil method
Overall impression: Great glitters, easy to work with, two winners for sure!
Buy again: Yes


I bought my Nail Pattern Boldness from Edgy Polish
You can find more info on Edgy Polish’s Facebook page, link here.

Tuesday, September 2, 2014

Lacquer Lust ~ Amethyst


Lacquer Lust ~ Amethyst
Purple linear holo

It’s sunshine and it calls for another holo! I’ve got some really pretty ones just waiting for me to chose them – and Amethyst was the lucky chosen one today.

The formula is good, and the polish is easy to work with. I used two coats for desired opacity and the drying time between the coats is pretty good.

I went out into the sunshine, and whoa, the rainbows showed up on my nails. Take a look – here’s two coats and no topcoat:


If that’s not pretty then I don’t know what is!


Low light picture. It almost looks like a scattered holo in low lights.


I stamped on it. I chose heart-y designs from MondleBunster plate BM-411 and I stamped with Kiko 618 Orchid Pink from the Mirror Collection. I applied a layer of Poshé topcoat before I took my pictures. Here’s my final mani in the sun:


And here’s the same thing in lower lights so you can see the designs I chose.


Number of coats: 2
Drying time: Pretty good
Finish: Linear holo
Overall impression: It’s a high quality polish with pretty rainbows in it.
Buy again: Yes

I bought the Lacquer Lust from norwaynails.com.
You can find more info on NorwayNail’s Facebook page, link here.

Norway Nails have kindly offered my readers a 10% discount code. Just use the code RAINBOWIFYME10 at checkout, and you'll be getting 10% off your purchase.

Monday, September 1, 2014

Magical Music Manis 1: Counting Stars ~ One Republic


Welcome to the third challenge I do, based on music. It’s not a secret that I love music, and that it really motivates me to try and make songs into nail art. 


The first song is Counting Stars. I knew I wanted to make a galaxy mani, and I also knew that I was going to use a specific topper – I’ll get back to that.

I started with a purple/blue gradient. I decided to use polishes from the Helmer: Oldies but goodies. I used Orly “Velvet Rope” which is deep purple with silver shimmer and Maybelline Color Show “Blue Freeze” which is a deep blue shimmer. I used OPI’s Glitter Off around my cuticles in order to make the clean up easier. That did not work today, I don’t know if I applied a layer that was too thin or because I left it on for too long, but it was a nightmare to get off again :/

While I talk I might as well show you the final mani:


I dapped some pink glitter on the gradient. I used Kiko’s #438 Fascinating Burgundy, and I carefully sponged on a little bit here and there.


When that was dry I applied a layer of the topper I mentioned in the beginning of my post: Chaos & Crocodiles’ “Lollipops and Baby Hippos”. It’s a clear base with pink, lilac and baby blue multi shaped, multisized glitter and it’s perfect for this purpose!


Here are the four polishes I used:


Here’s the video to Counting Stars:


Check out the other cool girls who participate in this challenge. Would you like to join? Please feel free to!