Sunday, August 24, 2014

New challenge: Magical Music Manis

Hi girls!

It's time for another music challenge! It's starts on Monday the 1st of September and runs every Monday for 3 months. 


I've got some help to pick the songs this time: Thank you so much to Szilvia from K-öröm  and Alicia from RealPassionPolish for helping me chosing the songs

Here's what the challenge looks like:


I've put this challenge together to force myself to be more creative.

Would you like to join? Please feel free, it would be awesome! 

Next weekend I'll make an Inlinkz-tab here, where you can pick up the code for each challenge. 

I'm looking forward to next Monday already. 

Darling Diva ~ Caliente & Ms. Monster Esq.


Darling Diva ~ Caliente & Ms. Monster Esq.
The last two from my grab bag

Here are the last two polishes from the grab bag I bought.

The first one for now is Caliente, which is a clear base with red glitters, hexes, microglitters – and some pink microglitter and more that I can’t put my finger on, so to speak.

I decided to layer it over white. Two coats of OPI’s recent “Angel with a Leadfoot” from the Mustang collection, and then just one layer of Caliente. I didn’t fish for the glitter – I dipped once in the bottle for each nail, no more than that.

And I dig this over white, much more than I thought I would!

Here’s one layer over white, and one layer of Poshé topcoat:


I love the addition of multisized glitter in this!


One last shot:


Verdict:
I found out after I took this off that Caliente actually glows in the dark! Bummer that I didn’t know that before I actually took the polish off!
But all in all I really like this polish – it’s got a nice mix of red glitters in various sizes and shapes, and red is always nice!


Next one up is Ms. Monster Esq., which is a green tinted base packed with glitters: I see red, purple and green glitters, white, pale green and black hexes, white squares and… perhaps even more :D

I layered it over a dark shimmery polish from the Sally Hansen Insta-Dri-line: Jumpin’ Jade.

As always: One dip in the glitter per nail. I topped my mani with topcoat, and here’s what Ms. Monster Esq. looks like:


I did dab the glitter around a bit in order to get some of the larger bits spread out more, but it wasn’t a hassle to layer this polish.


The biggest surprise was to find out that some of the hexes are actually pale green and not just white. Score!


Verdict:
I think I’ll be using this for Christmas manis – the red, green and white reminds me of Christmas.


Darling Diva sells grab bags with 5 polishes for US$25. You can’t chose which colours you get, so every bag will be a total surprise.  

Saturday, August 23, 2014

Darling Diva ~ Angry Beaver & Tickle me Cured


Darling Diva ~ Angry Beaver & Tickle me Cured
A couple more from my grab bag

I have decided to show you all the polishes from the grab bag I bought from Darling Diva recently. I have already showed you ‘Thank you’ and ‘Never Give Up’. Now I’m going to show you two others.

First one is Angry Beaver. I must admit that the name makes me snigger! It’s a sheer purple jelly base with heaps of various glitters and hexes in a brazillion colours. Seriously, there’s so much going on in this polish.

I decided to not show it on its own. I started out with a red shimmer from Golden Rose’s Matte Velvet collection; #106. I love that collection – they’re cool colours and most of them are one coaters.

So, one coat of shimmery red, and then a layer of Angry Beaver diagonally across each nail. I made the stripe of glitter with a dotting tool. Easy peasy!

One layer of topcoat completed the mani, which ended up looking like this:

  
I actually tried to just apply a layer of Angry Beaver on my thumb, just to see how much the jelly base would actually cover, so take a look at that too.


I think it’ll take at least three coats on its own, maybe even four, so I definitely suggest layering for this glitter.


Here ‘s the sisters in crime:


Verdict:
Cool colours, nicely packed glitter – no need for fishing!


Next one up is Tickle me Cured, which is a deep magenta jelly base packed with white hexes and bars, amongst with a mixture of glitter in other colours, shapes and sizes! I even found a heart in there!

I started out with the same shimmery red Golden Rose I used for the first polish. This time I sponged the tips with the glitter, except for the ring finger, which got a layer on the entire nail. I sealed it up with a layer of topcoat, and here’s what Tickle Me Cured looks like:


There’s sooo much going on in this polish as well, it’s amazing!


If you take a look at my index finger, you can see the heart that I accidentally fished up :D


Here’s a bonus picture of the Golden Rose Matte Velvet I used as the base for both these pretty glitters:


Verdict:
This is probably not the last time I’m going to use this for a glitter gradient. I like it a lot, and the colour is SO me!


Darling Diva sells grab bags with 5 polishes for US$25. You can’t chose which colours you get, so every bag will be a total surprise.  

Friday, August 22, 2014

Darling Diva ~ Thank you & Never Give up


Darling Diva ~ Thank you & Never Give up
A couple of “unusual” manis

Today I’m going to show you a couple of manis on which I’m wearing colours that are unusual to me. I bought a grab bag from Darling Diva recently, both because I like surprises and obviously also because I love Darling Diva’s polishes. The beauty of grab bags is that you never know what you get, and that sometimes forces you out of your comfort zone – just like it happened with these two polishes I will show you in a moment.

The first one up is Thank You, a white crelly with purple, green and blue hexagons in two different sizes. I usually don’t wear white – I love a bit of colour. But I wanted to see what this one looked like on me.

I wanted to be sure that I didn’t have to use a million coats to get full coverage so I applied a layer of basic white – Savina’s French White, which is a plain white crème. Then I applied two layers of Thank you. I had to fish a bit for the hexes – there are not that many of them in the polish. But you know the rule: One dip in the bottle per nail. The drying time between the coats was average. I finished it off with a layer of Poshé topcoat.

Here’s “Thank You”. One layer of white crème, two layers of Thank You, one layer of topcoat:


I am somewhat surprised that I actually like this.


The hexes “swim” in the crelly, it’s a nice effect!


Verdict:
I would never have bought this polish on my own, since I don’t wear white. But I can see myself wear this again, perhaps with a purple, blue or green stamp over it. Sounds cool, doesn’t it?


Next one up is Never Give Up, which is basically a yellow jelly with tons of shimmer. I didn’t think this would work on its own, so I started out with a new white crème of mine: OPI Angel with a Leadfoot from the recent Mustang collection. I have heard it is a one coater - but it isn’t. Two coats is what it takes. It’s fairly easy to work with and the drying time is pretty average. I don’t usually show white crèmes because everybody knows what they look like…white, yes? But I’ll make an exception today.

Here’s two coats of Angel with a Leadfoot – and no tocoat:


It’s a pretty good looking white IMO. 

Anyway – back to the Darling Diva “Never Give Up”, which is the polish this part of the post should be about. I applied two coats of the yellow shimmer over the white. The first coat looked good, and I almost stopped after that one. But I moved on and applied a second coat, and that intensified the colour SO much! Whoa!!! I’m amazed over how big a difference that made! The drying time between the coats is fast.

So! Here’s two layers of OPI’s white crème and two layers of Darling Diva Never Give Up:


This is almost highlighter yellow! Look at that shimmer, it’s just… wow!!


Shimmer picture!!


That bright yellow called for sunshine and I hadn’t got any available. So I grabbed an orange texture from Julie G called Sugar Rush and made a little sun on each nail. Here’s my final mani:


This makes me happy!


Verdict:
I usually don’t like yellows much but this is friggin’ gorgeous! I don’t  (and won’t) ever get a tan over summer but I’ll definitely wear this anyway!


Darling Diva sells grab bags with 5 polishes for US$25. You can’t chose which colours you get, so every bag will be a total surprise.  

Thursday, August 21, 2014

Girly Bits ~ What the Deuce


Girly Bits ~ What the Deuce
Kelly green holo shimmer

What the Deuce is from the Girly Bits Fall 2013 collection, and is inspired by the TV series Family Guy.

Formula is good just like I expected. I had no problems with application whatsoever. I used my regular base coat, and had no problems with dragging or bald spots. Coverage is good too; I used two coats to make it opaque, and drying time between coats is faster than average.

Here is a picture of two coats, no topcoat, picture taken with flash:


The rainbows aren’t prominent, but they’re there, and I love the colour of this!


Here’s a picture taken in low lights. I still love the colour!


I decided to try and stamp with a neon orange from El Corazón, which I showed you on its own in this post. I found three different motifs on the stamping plate Punk Collection-01 from Moyou London. Stamping with the El Corazón needed to be done really fast, because it dries superfast, but I managed. I topcoated the whole thing, and here’s my final mani taken with flash:


The neon orange didn’t pop as much as I had hoped for, but it still looks cool.


Here’s a rare macro photograph of my thumb. I love this motif: “Punk Rock Girl”!


And here’s a low light picture:


I like it. ‘Nuff said!

Wednesday, August 20, 2014

Catrice Crushed Crystals ~ 01 Royal REDding


Catrice Crushed Crystals ~ 01 Royal REDding

It’s been months since I showed off my first Crushed Crystals (if you missed the post you can see them right here), and now I finally managed to get my hands of the red beauty of the collection: Royal REDding.

Royal REDding is a red jelly base with red micro glitter, and it’s a texture. The application is easy and I used two coats for these pictures. The drying time between the coats is pretty good.

So: Here’s two coats and no topcoat:


I love the way the microglitters sparkle. Both these two pictures are taken in my lightbox, because the sun sulked and refused to shine!


I love reds with microglitter, they’re SO beautiful. I should have kept it like this but I didn’t. I made two lines of small stripes down the side of my nails and I applied a layer of Barry M’s Crystal Glaze on top of it all. It’s a flakie and it’s usually really pretty. But take a look at how it ended up looking like:


I’m not crazy about this myself. I think there’s way too much going on.


So that wasn’t my most successful experience with the pretty flakie. I think I will use it for more “simple” polishes in future; polishes that don’t have a lot going on themselves too.

The Crushed Crystals was a limited edition collection and is now discontinued.

Tuesday, August 19, 2014

Glittering Elements ~ V.I.P. #9


Glittering Elements ~ V.I.P. #9
Deep purple with holo shimmer and microflecks

Here’s a special polish for you. V.I.P. #9 was a polish that Casey included in orders placed on her birthday back in May. She says there are around 20 bottles in total, and I’m thrilled to be the owner of one of them! :)

Application was really easy and two coats is what it took to make this baby shine. Drying time between the coats is good too.

Here’s a picture taken in the sunshine – it’s just two coats, there’s no topcoat involved just yet.


I also took pictures in my lightbox.


Here’s a low light picture to show what a lovely colour this is and to try and show you the flecks.


I made vertical stripes on it with a silver holo polish from Urban Outfitters and then I sponged some glitter on from H&M’s Snow White series – “Silver Frost”. I topcoated the entire thing, and here’s my final mani taken with flash:


The flash almost makes the glitter disappear so here’s a low light picture too:


*showing off the bottom*


The pretties: 

This combines so much of what I like in a polish: Holo, glitter, flecks, purple and easy nail art. I really hope you like it too!


Number of coats: 2
Drying time: Good
Finish: holo with flecks
Overall impression: Good colour, nice effect and easy to work with. LE though!
Buy again: Yes – if it was possible

Monday, August 18, 2014

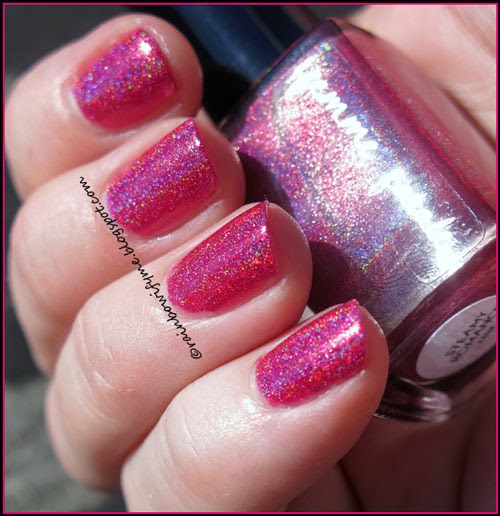
Femme Fatale ~ Steamy Romance


Femme Fatale ~ Steamy Romance
Bright magenta linear holo

Steamy Romance was part of the Valentine 2014 trio. The other two are “Bed of Roses” which is a green glitter topper with hearts and “Enchantress” which is a metallic duochrome that shifts between teal and purple. I only got Steamy Romance of the three – I do love holo and couldn’t miss this beauty!

The formula is great and Steamy Romance is pretty much a one coater. I did two to make sure that the camera wouldn’t pick up irregularities unseen by the human eye! Drying time is pretty good.

Here’s a sunshine picture; two coats, no topcoat:

 
Isn’t that just an amazingly beautiful colour? And look at those rainbows!!


This picture is taken in my lightbox. The rainbows still want to play.


I made a zigzag pattern on each nail with Glittering Elements’ “Don’t pet the Cheshire”, a lovely deep purple holo that I showed you here. I just used a striper brush to make the zigzags with. I topcoated the entire thing before I took these last pictures:


The zigzags clearly show that I need to practice my freehand skills more. They’re not perfect, but I love them anyway ^_^


Here’s a picture of the box the polish came in:


This is a gorgeous colour, I really like it! The quality of the polish is fantastic and I obviously love the rainbows!
  

Number of coats: 2
Drying time: Fast
Finish: Linear holo
Removal: No worries.
Overall impression: Fantastic colour, lovely rainbows, great quality polish
Buy again: Yes

I bought Steamy Romance from norwaynails.com.

Norway Nails have kindly offered my readers a 10% discount code. Just use the code RAINBOWIFYME10 at checkout and you'll be getting 10% off your purchase.