Summer Challenge Day 30: Inspired
by a tutorial
This is one of the challenges I’ve been looking forward to! I love
tutorials! And especially the ones that state “It’s super easy”. I found a
great one on YouTube, and let me show you the result I got out of it first:
Neat, eh?
And here’s the tutorial I made it after.
Here’s the colours I used. For the base I used two coats of Sephora’s
“Summer in Bangkok”.
It’s a turquoise/green shimmer polish, that’s got such a great formula. It’s
easy to apply and almost opaque in one coat. Here is a pic of two coats, no top
coat.
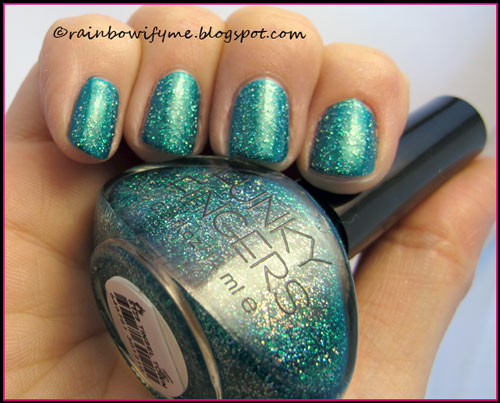
Then I applied a bit of glitter. I used Funky Finger’s “Tinsel Town”,
which is a green base with green and holographic glitters. The base is
relatively dark, so my guess is that it can be used on its own, and that it
would probably take 3 coats to make it opaque. But here’s a pic of that step.
One coat of Tinsel
Town over the Sephora.
After that I added the stripes, black and white alternately. I used
Claire’s “Two way nail art pen & brush” in black and white for that step. I
didn’t take a pic after that step – it’s all in the YouTube tutorial after all
:D
And then it was time for some dotting. I used Flormar 400, which is a
plain white crème, and Flormar NA12, which is a black striper. I used a double
sided dotting tool.
I must admit that I’m more than pleased with how this mani turned out. I know that my hand isn’t as steady as in the tutorial, but hey, practice makes perfect, right?
Which colours would be cool to make this pattern with? Like, Turquoise,
purple and silver? Suggestions are more than welcome! <3
There are other Danish girls who also did a “inspired by a tutorial”
mani today. I’m curious about which tutorials they followed, so why don’t we check
their blogs out?


A manicure with dots can never go wrong :) Looking really good.
ReplyDeleteThank you so much, I agree about the dots - I love them!
DeleteIt looks great, well made - and I LOOOOVVVEEE the shape of the Funky Fingers bottle LOL
ReplyDeleteThank you so much :) I love Funky Fingers polishes too, but it *can* be a challenge to get a decent hand pose with the shaped bottle LOL
DeleteI love nails with dots, and this looks very pretty. Great tutorial!
ReplyDeleteI made for my blog a Facebook page, if you like, you can look up for it: https://www.facebook.com/andicolouryourlife
Thank you so much. I was happy to find this tutorial, because I will try this again!
DeleteBeautiful manicure!
ReplyDeleteThank you :)
DeleteDUDE!!!! THis is freakin awesome!!! I need to try this out! AM so doing this
ReplyDeleteAwesome! I can't wait to see your version!!!
DeleteVery cool!
ReplyDeleteThis turned out great! I love that base color you used, as well as the pattern. Very fun and retro. :-)
ReplyDelete~ Yun
Retro is the word I was looking for, thanks! :)
DeleteYou did so awesome! Looks great!
ReplyDeleteThank you sooo much! :)
DeleteThis looks awesome, great manicure! And I'm sorry I was gone for a while, I was so busy... :( But all your manicures look great, even if I don't comment on each and every one. ;)
ReplyDeleteDon't be sorry, I know you're a busy girl! And thanks for the kind words. Speak soon! <3
DeleteThese look really great =]
ReplyDeleteOh thanks. I need to try this again soon :)
DeleteThat Funky Fingers is gorgeous.
ReplyDeleteI know, right?! :D Thanks!!
Delete