Monday, March 11, 2013

Hot Topic with holographic skull stamps

Hot Topic ~ ?
Multichrome shifting between blue/purple/green/something

I know that Hot Topic’s polishes aren’t necessarily of the highest quality, but I’m a sucker for a great looking bottle. And I love skulls – so this polish just had to be mine.

I used three coats for desired opacity, and the drying time wasn’t the fastest, so that was quite a challenge for me :D But anyway – the effect of this polish is quite special, and unfortunately almost impossible to capture on pictures :/

Here’s an attempt:


It flashes so many different colours, depending on which light you see it in. In direct light it flashes mostly blue and purple, but in low light I see both teal and dark green. Quite special!!

It is also shimmery, which I really like. 


I stamped on it, and as a tribute to the bottle (and perhaps also a little bit to the colour), I chose to stamp skulls on it! I used Gosh Holographic Hero as my stamping polish, and stamping plate from Konad M13:


There’s a layer of BK top coat over the stamp.


This didn’t quite turn out quite as I expected, which was a disappointment - but hey, sometimes it’s just like that. A bit like Life. I try to turn all of my less cool manis into learning experiences, figure out why it didn’t happen for real the way it did in my head, and try to get better each time I do my nails.
 

Opacity: 4/10
Colour, prettiness: 6/10
Durability: 5/10
Value for money: 5/10
Overall: 5/10
Buy again: Yes, but only for the bottle

Sunday, March 10, 2013

Pretty Serious ~ Seasonal Sunset part 2

Pretty Serious ~ Seasonal Sunset
Rusty jelly base packed with bright golden and copper microglitter

I originally showed this polish in this post. I remained somewhat intrigued by this polish, and was eager to find out if I couldn’t actually present the polish a bit better on my nails, even though this warm, copper orange isn’t really my colour. So here goes.

I decided to use this in a gradient. I used it as the “middle colour”, surrounded by Douglas’ “Ready to go”, which is a beautiful orange shimmer, and Sally Hansen Insta Dri “Wined Up”, which is a deep burgundy shimmer. I thought these two would be great company for my Pretty Serious polish.

And here’s how my gradient turned out. There’s one coat of Catrice Quick Dry & High Shine topcoat over it:


See? That’s much better when the polish gets to compliment a couple of sisters! :)

I wanted to stamp a palm tree over this, to make it look like a sunset, but the only two palm trees I have, have got “California” written on them, and that was definitely not the look I was after. Instead I found a sun on Bundlemonster’s plate BM01, and I stamped with a no name black polish:


There’s one coat of Poshé top coat over it to seal it up:


I’m amazed over how nicely this goes with my skin tone!


And here are the polish sisters in crime:


So, what do you think? I must admit that I’m more than pleased with how this turned out, despite that fact that I didn’t get palm trees on it. I need to look for a plate with such a design on it :)

Saturday, March 9, 2013

Accessorize and Hits = Dreamy Mermaid


Accessorize ~ Aquamarine
Metallic teal

and

Hits ~ Blue Jazz
Blue base with blue and green glitters


I had one of those days where I came home from work, and I was absolutely knackered! So I removed the “old” polish, and went for something easy. I didn’t want to mess around too much, being that tired. So I used a new polish from Accessorize called Aquamarine, which is from their Metalized series. It looks so pretty in the bottle, which is obviously why I bought it in the first place. But on the nails? OMG, it’s absolutely beautiful!

It is indeed a one coater, and here’s what one coat looks like:


It isn’t really blue and it isn’t really green either, so I guess that makes it a teal, or what? I don’t mind what we call it – I’m in love:

 
Now for the extra. Like I said: There was no way I was going to challenge myself, so I went for something know and tried before: Glitter tips!

I used a glitter from Hits’ MTV series called “Blue Jazz”. It’s a lovely blue and green glitter, which I figured would be perfect for this teal base. I sponged my tips with it and gave it two layers of NYC Turbo fast dry top coat:


And from another angle:


This mani did wonders for my mood. I was still tired, but now I was happy that my mani turned out even prettier than I dared hoping for.


It reminds me of mermaids. Dreamy mermaids – which is what I’m going to call this mani. 

What do you think? Do you have a special polish that you use as your “to go”-polish, when you want to make sure it actually works?
  
Both polishes: 
Opacity: 10/10
Colour, prettiness: 10/10
Durability: 10/10
Value for money: 10/10
Overall: 10/10
Buy again: Yes!

Friday, March 8, 2013

Hand cushion review


Hi girls,

 Today I'm going to show you a hand cushion:


The cushion was not at all what I expected it to be. I expected it to be a firm “pillow” to rest my hand on when I do my nails. The cushion is really firm, and it’s got a hard bottom. I think there’s a piece of wood inside. The cover also surprised me. It’s made of plastic, which I guess is a good point, since it’s impossible to put this piece of equipment in the washing machine. I don’t like the feel of it though...I would have preferred fabric, I think. The cover can’t be removed either; it’s stapled on.


I usually do my nails when I’m sitting on the sofa, and this cushion helps me get my nails up in a good height for polishing them.

The size is 30cm x 10cm x 5.5cm (approximately 11.8in x 3.9in x 2.2in)
Here’s a picture of it with my hand on it, so you can see the size of it.


I need to get used to working on the cushion and make myself some good habits with it. I’m not overly thrilled yet, but I still think it’s a pretty good piece of equipment. Perhaps someone who do other people’s nails will appreciate it more than me. I’m only ever doing my own nails :)

The verdict:

Pros:
-         It helps creating a good work height
-         The cushion is firm, helping you keep your hands steady
-         I love the tiger/leopard design
-         It’s a very good idea *under the right circumstances*

Cons:
-         It’s plastic, I don’t like the feel of it
-         It’s easier (for me) to just do my own stuff without it


Thursday, March 7, 2013

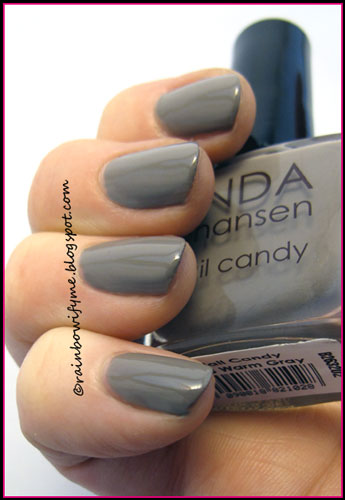
Linda Johansen ~ Warm Grey


Linda Johansen ~ Warm Grey
Warm grey crème – or dark beige

When I started applying this baby it was obvious to me that this is definitely a quality polish. One of those polishes that are easy to apply, and that cover well without any hassle.

“Warm Grey” is a one coater! I was amazed. I thought I was going to apply coat after coat to make it opaque, but that was certainly not the case here. I applied two coats for the camera, but believe me, one coat would have done! One coat of Catrice Quick Dry & High Shine top coat, and here’s what that looks like:


The polish has a really nice shine to it, and depth:


I think that it shows on the pictures that this polish is of really good quality, and a class product.


Here’s what Linda Johansen wrote about this particular polish:
A timeless warm grey color that's a little bit more "edgy" than the classic Mannequin. Chic and elegant for those who want a discreet look and dare a little more. Not shimmer and a neutral undertone.


I don’t think I’ll go as far as to call this polish “edgy”, but that’s probably just me :) I’ll show you what else this classy polish can do: Stamp!


I removed the grey from my ring finger and my thumb and applied one coat of Miss Sporty #313 – a lovely rich shimmery purple. 

Then I stamped using the opposite colours – I used a design from Mash’s stamping plate Mash-30. I sealed it all up with one coat of Poshé top coat, and behold – Warm Grey works as a great stamping polish:


Here’s one last shot of it, just to show you the Miss Sporty polish as well!


I am quite pleased to enrol this polish in my stash, knowing that it’s great both as a base colour and as a stamping polish. I appreciate quality when I have it, and it was a revelation how well this took to both stamping and being stamped on. So yes – this ended up as a winner in my book! I told you it ended well! :)


Opacity: 10/10
Colour, prettiness: 4/10
Durability: 10/10
Value for money: 8/10
Overall: 8/10
Buy again: Yes
 

Wednesday, March 6, 2013

A England ~ Lady Shalott


A England ~ Lady of Shalott
Blackened base with blue shimmer

If you like the quality of A England’s polishes too, then you certainly won’t be disappointed in this one. It’s the same nice formula, easy to apply and very well pigmented. It was opaque in one coat, but I applied two anyway, to enhance the depth of it.

The shimmer is a bit on the shy side, but it’s there. Here’s two coats of Lady of Shalott with one coat of Catrice Quick Dry & High Shine top coat over:


And from another angle:


This colour is dark and vampy and a must have if you’re into that colour range of polishes.


Lady of Shalott is from A England’s series of Gothic Beauties, and she’s got four other sisters with different colours of shimmer in them. 

Here’s what A England write about this particular polish:
A captive and ethereally beautiful sapphire heart, shrouded in a blackened curse

Not bad, huh?

You know I’d never wear any pretty polish on it’s own, so what I did was to apply an additional coat of shimmer in the shape of Orly “Love Each Other”. It’s a purple shimmer, which didn’t impress me to be honest. Then I sponged Icing “Runway” on the tips, and sealed it all up with a layer of Poshé top coat.


Here are all the pretties:


Verdict: If you’re into dark, vampy colours, you’ll love this. The shimmer doesn’t pop as much on my nails as I’d like it to, but then again, I acquire a lot of shimmer to be truly happy, hahaha! :D


Opacity: 10/10
Colour, prettiness: 7/10
Durability: 9/10
Value for money: 8/10
Overall: 8.5/10
Buy again: No

Tuesday, March 5, 2013

Nicole by OPI ~ Fabulous is my middle name


Nicole by OPI ~ Fabulous is my middle name
Silver Glitter base with gold, red, pink and blue micro bar glitter

Before I show you the glitter, I’m going to put on some underwear for it. I chose Gosh’ “Berry Me”, which is a lovely deep, berry red crème polish. Formula is great, like with most other Gosh polishes, and it took two coats to make it look like this:


Pretty, no? And perfect for the glitter. ‘Fabulous is my middle name’ is apparently from a limited edition collection from spring 2012, only released in Walmart. I picked mine up in a blog sale, and am very happy with it, even though I was in for a surprise!

I applied one coat over my ring finger and my thumb. On the other fingers I applied a coat of Accessorize “Lady Bird”, which is a red jelly with black dots in it. Here it is, with one coat of BK top coat over it:


The surprise I mentioned was that the glitter contains bar glitters. I seriously didn’t see that before I looked through the pictures I took of this mani after I’d applied it. And I actually wear my polishes, which means that I’m having it on for at least a day before I take it off. And I just didn’t see the bar glitters, even though I looked at my nails often!

Here’s a close up of the bottle. Look at all those colours in it!


And here’s one of the entire mani. This is definitely not the last time I wear this glitter, despite of the bars!


Here are the pretty bottles:


Have a polish ever revealed secrets to you on the pics that you didn’t see in real life?

Monday, March 4, 2013

Femme Fatale ~ A Frosty Shake


Femme Fatale ~ A Frosty Shake
Clear base with diamond sparks and iridescent squares, white glitter in various shapes and sizes and a splash of teal

I believe that “A Frosty Shake” is meant to be layered over a pastel, but I am really not that much into pastels. I tried over a teal first, but then the pretty teal glitter drowned, so I ended up deciding to layer it over a plain black crème. That way you also get to see how much there’s really going on in this polish.

The polish seemed a bit lumpy when I pulled up the brush, so I gave it a good shake before using it and that helped. It’s packed with various glitters, so it’s quite dense even though it isn’t meant to be worn alone.

I’ve got one coat of Poshé top coat over to seal up the pretty glitter. 


The glitter spread out evenly, and I didn’t have to fish for the big white hexagons, which is a huge plus.


Drying time is great, no problems in that department either.


There’s only one thing that bothers my eye with this, and that’s the text on the bottle. It’s written from top to bottom. Most brands write their text so that it reads from the base up to the lid, but this one is written so that it reads from the lid down to the base. That means I have to point it in the opposite direction when I take pictures of it. I know it's a small thing, but I don’t like it.


All in all however, this is a great polish that you can layer over whatever colour you feel like. It’ll be a nice, soft look if you layer it over a pastel blue, and a more “kapow” look if you layer it over black as I did.

Yes, this polish is a win in my book!


Opacity: N/A/10
Colour, prettiness: 9/10
Durability: 8/10
Value for money: 9/10
Overall: 8.5/10
Buy again: Yes

Saturday, March 2, 2013

Pretty Serious ~ Seasonal Sunset


Pretty Serious ~ Seasonal Sunset
Rusty jelly base packed with bright golden and copper microglitter

Seasonal Sunset is from the collection “Christmas without Snow”, and is from last year.

I applied two easy coats to make this baby opaque. The rusty, orange-y colour really reminds of a sunset. It’s warm and welcoming!

I’ve got one coat of Poshé top coat over these pictures, and I think I’ll let the pics do the talking today: 


These pics show all the various colours of glitter: 

It's truly an amazing polish! 


The last pic is taken in the sun. That really brought the polish to life.


The polish – also in the sun:


Here’s the back of the box. I love that image!


Here’s what Pretty Serious write about their polishes:
Pretty Serious Cosmetics currently deals primarily in fun, yet elegant nail polish. Our polishes are professionally manufactured in Australia, and are Big 3 free, formaldehyde free, cruelty free and vegan friendly.

I have a complicated relationship with orange. I love the colour and the warm tone to it, but it just doesn’t always go with my skin tone. I do like this polish though – I think it’s going to find its use in nail art of flames and sunset gradients. Stay tuned for that!

All in all I am very impressed with Pretty Serious, and will look out for other examples of their polishes to see if the quality matches this one.


Opacity: 7/10
Colour, prettiness: 7/10
Durability: 8/10
Value for money: 8/10
Overall: 7.5/10
Buy again: No – but only because it isn’t my colour
  

Friday, March 1, 2013

POP Beauty ~ Midnight Minx, with L'Oreal and Barry M


Color Changing polishes

Today I’m going to show you a mani I made with three of my untrieds; and two of them are special polishes: One of them can change colour itself, and the other one can change other polishes’ colours. Let’s see how that went, shall we?

I started out with a dark purple, very vampy polish, namely Pop Beauty Nail Glam: Midnight Minx. It’s a polish that flashes some shimmer in the bottle, but not so much on the nails. The formula was okay as long as I worked fast. If I worked a bit slower, the polish started to act gooey and weird. But anyway – second coat evened out almost all irregularities for me.

Here’s that first step:


Now for the first special polish, which is a shimmer from L’Oreal called Crystalissime. I found it at Christmas time, and apparently it’s a limited edition polish. I would probably have bought two of them if I had known that back then. But never mind! I want to show you that this polish actually manages to change the underlaying colour. I’ve applied one coat on my little finger and my ring finger, and nothing on the other two. Take a look for yourself:


Do you see how the shimmer almost removes the blue, leaving a gorgeous purple shimmer?

On this pic I’ve applied Crystalissime on all the nails. I love this shimmer!!


Now for the next colour changing polish. It’s a Barry M called Chameleon Pink, which changes colour when a top coat is applied. I didn’t buy it for that effect though, but solely because I’ve heard it should be fantastic for stamping.

So – I used Gals stamping plate GA23 from the Princess set and stamped with the Barry M. It looked nice without the top coat, but I don’t wear my manis without topcoat. So I did the same thing: Top coated my little finger and my ring finger, and left the others alone. And here’s the result:


The top coat definitely makes the shimmer pop more, but it doesn’t change the actual colour of the Barry M much. 

Here’s a fully top coated mani:


And the three polishes I used:


I was curious about the Barry M, so I painted a layer of it on a nail wheel so see how much it actually changes colour when you don’t just use it for stamping. When it was dry, I topcoated half of it, and behold, it really does change colour:


That’s it. Three untrieds nailed! :D
Do you like effect polishes? Do you use any?