Sunday, June 30, 2013

Treasures by Tan ~ Purple Nurple


Treasures by Tan ~ Purple Nurple  
Deep purple linear holo

You should all know by now that I’m a sucker for a good holo! I bought six of Treasure by Tan’s holos since I thought they looked really pretty on swatches.

Let me tell you right away that I was really disappointed in them. I applied the first coat and it looked absolutely horrible. The base colour isn’t very pigmented and it all went streaky and weird. I used my regular base coat – perhaps that was a mistake, I don’t know. I thought and hoped that the second coat would level it all out but it didn’t. It just looked even more streaky and horrible. I tried to figure out how many coats this would take to make it look reasonable. I think the correct answer is four or five, and I am just not that kind of girl! I wiped it all off again, and started over.

I applied one coat of Flormar #448 from their spring and summer collection 2012. It’s a vibrant purple that’s opaque in one coat. I didn’t take a picture of that step, since you can see it right here.

Then I applied two coats of Purple Nurble. The formula is alright, it dries relatively fast. The only downside as I see it is how sheer it is. Bummer!

Anyway – while I did all the wiping off and applying polish again, the sun disappeared behind a cloud, and refuse to come back out and play, argh!!

So these pictures are all taken under a light bulb, so you can see the pretty rainbows this polish has.

Two coats over Flormar #448:


The colour is deep and the rainbows are really pretty. I don’t think I would have gotten this colour without the deep purple underwear though. But I’ll definitely try the next of my Treasures by Tan polishes, that’s for sure. I seriously hope that it’ll help!


I really like that this polish is wearable in the shadow too. Lots of holos aren’t quite pretty enough for that, and it’s a waste because I spend more time in the shadows than I do in the sunshine!

 
I must admit that I’m disappointed. I hoped that these polishes wouldn’t need any underwear! I hope that an aqua basecoat will solve at least a bit of the problem, even though I don’t really think so. I’ll give it a go anyway. I’ll decide whether these can stay or if they need new homes when I’ve tried all six of them!
What do you think? Would you keep it even though it needs underwear?


Opacity: 3/10
Colour, prettiness: 8/10
Durability: 6/10
Value for money: 5/10
Overall: 5.5/10
Buy again: No

Saturday, June 29, 2013

Pastel ~ 144 with Golden Rose Holiday ~ 52


Pastel ~ 144
Baby pink crème

I know that a lot of you would like to see me wear pastels – at least some of you said so when I showed you my latest Turkish haul from my friend Aylin from Posh Nail Art. Well, your wish is my command so here’s the first ones of the pastel Pastels. Confused much? The brand is called Pastel too :D

Anyway – I’m not used to using colours like this, so I was afraid that it was going to take layer after layer to get this opaque. Well, it didn’t! It took two layers, and the formula was just great, the second layer of polish was pretty much self-levelling. And the drying time was good too. So this lived up to the quality I’ve learned to expect from Pastel!

Without further talking, here’s a picture of two coats of #144, no topcoat. The picture is taken in daylight, with no direct sunshine.


That doesn’t look that bad on me, I don’t think! But please don’t hesitate to tell me what you think!!

I sponged on it! I used a Golden Rose textured polish from their Holiday collection, called #52. It’s a pink base with pink and silver glitters in it. I sponged a striped down the middle of my nails. I didn’t apply topcoat, because I wanted it exactly like this: 


These two pictures are also taken in daylight.


I have to admit that I really like this. I would never wear the pink pastel on its own, but it is such a great base for nail art and suchlike!


Please tell me what you think of this. And tell me if you think that this pink looks OK on me! :)


Pastel ~ 144
Opacity: 8/10
Colour, prettiness: 6/10
Durability: 7/10
Value for money: 8/10
Overall: 7/10
Buy again: Yes

Friday, June 28, 2013

Five Days of Glittering Elements 5 ~ Midnight Magic


Glittering Elements 5 ~ Midnight Magic
Blackened base with blue square glitters, gold hexagons and multiple colours microglitter

Here’s the last post in my row of “Five Days of Glittering Elements. Today we’ve reached the darkest one of the five: The black one.

The formula was good. I must admit that my heart sank when I applied the first coat though, because it looked as if it was going to take 5 layers to make this opaque. But in reality it only took three coats, so that was a relief, haha!

Here’s what three coats and one layer of Poshé topcoat looks like:


You might notice that I only got one of the bigger hexagons on my nails. I didn’t fish for them, I just took whatever the brush brought back up from the bottle when I dipped it. I don’t mind, in fact: I prefer when my nails aren’t covered in big glitters, so one here and there is perfect for me :) And the small glitters do their job for this polish!


The blue microglitter is a really cool detail that gives the impression of a beautiful starry night sky; I like that!


And here’s one last shot. Do you like it?


The verdict:
This is a nice blackened polish, and the black doesn’t dull or drown the glitters, like it sometimes happens in black polishes. Here the glitters show up nicely and add that bling it takes for me to actually like a black polish. Drying time is the same old story as with the rest of the bunch: A bit on the slow side; but I put this on in a warm and humid room, so that is probably part of the reason for the slow drying time. Please don’t take this as a criticism – we need a cooler and less damp day to determine the true drying characteristics – the weather’s not doing me or the polish any favours here, for sure.

Thursday, June 27, 2013

Five Days of Glittering Elements 4 ~ Princess Grape


Glittering Elements 4 ~ Princess Grape
Purple shimmer with red, orange and blue glitters, and periwinkle hexagons

Here we are with the second to last post in the row of my “Five Days of Glittering Elements”. Today we’ve reached my absolute favourite of the bunch, namely the purple one.

The formula was great, and the glitters and hexagons spread out easily without fishing or pushing the brush around on the nails. I had exactly the same issues here as with the others, with drying time – I really need to try this when the humidity has gone down a bit. I’ll let you know when that happens!

Anyway – it took three coats to make it look great, and here it is with one layer of Poshé topcoat on:


Again, no fishing was necessary; I got a nice number of hexagons on my nails.


I really like the numbers of red glitters; it looks amazing on the nails.


And I didn’t experience any lumpiness or bumpiness on my nails – it was all smooth and nice. A big plus in my book for sure!!


I was so pleased with the look of this polish that I just couldn’t stop taking pictures on it! :D


The verdict:
This is my favourite of the bunch. I love the colour, the shimmer and especially the red glitters in the purple base. The hexagons are exactly the size I prefer. 

Drying time was on the slow side for me, but I put this on in a warm and humid room, so that is probably part of the reason for the slow drying time. I keep emphasising this, because heat and humidity have such an effect on the drying times of the polish and I want to make sure that it’s not seen as an unwarranted criticism of these products.

Wednesday, June 26, 2013

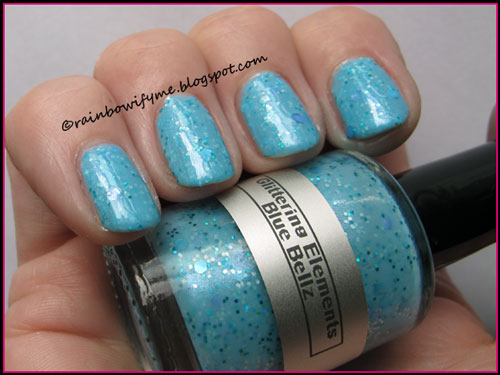
Five Days of Glittering Elements 3 ~ Blue Bellz


Glittering Elements 3 ~ Blue Bellz
baby blue shimmer with periwinkle hexes, teal micro hexes and silver and white micro glitters

This post is the third in the row of my “Five Days of Glittering Elements”. I’ve decided to show the five polishes in order, travelling from lightest to darkest, so click to see the white “Snowflake Kiss” - and the baby pink “Candy Lve reviews that I’ve already posted. But today it’s all about blue.  

The formula provided a bit of a trickier application experience than the first two polishes, but I can’t say that I’m surprised. There is much more glitter in Blue Bellz than there were in the previous two! But three thin layers is what it took to make this baby look the best, and here it is with one layer of Poshé topcoat on:

  
I didn’t fish for the glitters at all, but decided to just go with what the brush pulled up. And I was definitely satisfied with the number of hexagons and glitters I ended up getting. 


The glitters spread out nice and flat on the nails, so I didn’t end up with more texture than my faithful Poshé topcoat could smooth out. Sweet!


I’m a big fan of both glitters and shimmers, and I really like blue, so I’m very pleased with the way this polish ended up looking on my nails.


I didn’t do anything to try and make this look prettier. Amazing, eh? ;)


The verdict:
I really like the colour of Blue Bellz. I’m not a fan of chunky glitters, but these glitters manage to stay just the right size for my liking. As with the others I’ve tried previously, the formula was good. This was a bit more difficult to put on, but totally worth the extra effort :) Drying time again was on the slow side for me, but I put this on in a warm and humid room, which is probably a good part of the reason for that.

Tuesday, June 25, 2013

Five Days of Glittering Elements 2 ~ Candy L♥ve


Glittering Elements 2 ~ Candy L♥ve
baby pink shimmer with blue, yellow and pink glitter, white micro bars and pink holo hexes

Here we are on day two of my “Five Days of Glittering Elements”, this time with the baby pink polish of the bunch. Check out this post to see “Snowflake Kiss” that I posted yesterday.

The formula is approximately the same as Snowflake Kiss: Easy to work with, no dragging or bald spots, but it does take three coats to make this polish look its best. I had the same issues with the drying time, but again: It is pretty humid here at the moment, and that often means that the polishes take longer to dry than usual.

I didn’t fish for the glitters or bars, so what you see on the pictures is exactly what decided to hang on to the brush when I dipped it into the polish.

Here’s what three coats of Candy L♥ve looks like, with one coat of Poshé topcoat over:


See how the glitters manage to both blend in and stand out from the base colour at the same time? It’s sooo pretty:


I really like that this polish is shimmery and not just another jelly with glitters. That’s  exactly the way I like it!  


One last shot of the polish on its own, just because I can:


In order to honour the name I painted candy stripes on it. I used a red striper from L. A. Colors called “red” (hard to believe that name, I know), and just striped it vertically on the nails. Here’s what I ended up having:


If you ask me, then this is nice!

The verdict:
Candy L♥ve is a sweet and very girly polish. The glitters are well picked and match the baby pink colour perfectly. I even liked the square glitters, haha! The formula is just fine; I had no issues with application or anything. I’m not a fan of the drying time, but like I said, the polish didn’t have the best conditions that day.

Monday, June 24, 2013

Five Days of Glittering Elements 1: Snowflake Kiss


Glittering Elements 1 ~ Snowflake Kiss
White with pink shimmer and silver holo hexagons and diamond glitters

Welcome to five days of a new brand: Glittering Elements. I have five polishes and I decided to swatch them in sequence from the lightest to darkest. So here is Snowflake Kiss, the white one of the bunch. I’ll show you the other four over the next four days, so welcome to “Five Days of Glittering Elements”. 

Casey states that “I do not thin any lacquer, I will leave that up to customers’ personal preference.” Fortunately I like a polish that isn’t too thin, so the formula was just perfect for me. The polish applied easily and it took three coats to achieve desired opaqueness. Drying time is on the slow side, but it was a very warm and humid day – that definitely doesn’t help the process!

Here it is – three coats, and one layer of Poshé topcoat:


I didn’t fish for the silver holo hexagons, and I only got one by coincidence. It’s still a really cute polish though:


The little diamond glitters are discreet, and make sure that this polish isn’t just another white. On this picture you can see the one hexagon I got – it’s by the base of my thumb nail:


I’m a sucker for a good shimmer, and I love that this polish’s shimmer is pink.


On this picture you can see the holo hexagons in the bottle. They love the sun!


Even though I think this is really pretty, I can’t wear a white polish on its own. I applied a layer of Urban Outfitters WIP “Festival” which is a multicoloured glitter, and here’s my final mani:


The verdict:
Snowflake Kiss is a very cool polish, which I’ll probably be using as a base for nail art in future. I really like the formula – I had no issues with application or anything. The biggest drawback is the drying time, but like I said, the polish didn’t have the best conditions that day.

Snowflake Kiss is limited edition.

Sunday, June 23, 2013

Glitter Gal ~ Crushed Ego


Glitter Gal ~ Crushed Ego

Deep red-ish purple strong linear holographic


Here’s the last one of my three Glitter Gal holos, and the one I fell in love with the first. I’ve saved the best till last, that’s for sure! ♥


The formula was just as great as the others and this baby required two coats to be opaque. I just used my regular basecoat; I like that Glitter Gals’ holos don’t require the special aqua base coat. The drying time was great, so it didn’t take long to finish this mani.


Here’s what it looks like; two coats, no topcoat:


These two first pictures are taken in direct sunlight, and man, I just love what I see!


This picture is taken in the shade, and I’m stunning. This is the perfect purple holo if there ever was one! The polish looks great in the shadow too – and not dull at all. Hurra!!


This picture is also taken in the shade, just from a different angle. Isn’t it just pretty??


Unfortunately I decided to stamp on this. I wish I hadn’t, but never mind. I chose an all nail design from my Apipila P.2 plate, and I stamped with Gosh Holographic Hero. Here’s a picture before I added topcoat:


The butterflies are a bit too overwhelming, and dull the purple holo a bit too much.


But it still works, just not as I thought it would. And it’s still pretty out of the sunshine, which is important for me.


So, what do you think? Is this purple pretty, or what? Do you own any Glitter Gal polishes? If yes, which ones?


Opacity: 8/10
Colour, prettiness: 10/10
Durability: 8/10
Value for money: 9/10
Overall: 9/10
Buy again: Yes

Saturday, June 22, 2013

Glitter Gal ~ Lizard Belly


Glitter Gal ~ Lizard Belly
Dark black-ish green strong linear holographic

Here’s my second Glitter Gal holo! If I hadn’t read that Lizard Belly is dark green, then I would have thought it was black. It looks black in the bottle, and also when it’s out of the sunshine. But anyway: The formula is very good, and application was easy. I just used my regular base coat, and had no problems with dragging or bald spots. Drying time is good too, which is great, because I used three coats to achieve the desired opaqueness. I had hoped that two was enough, but it didn’t look quite right, so a third coat was definitely necessary.

Here’s what it looks like in the sunshine; three coats, no topcoat:


It’s obvious that the teal base is blackened here, and also how the polish got its name in the first place. Lizard Belly is a perfect name for this holographic beauty!


I guess it also shows why I thought this was black to begin with, doesn’t it?


The rainbows are amazing, and the holo is strong in this polish.


I didn’t take pictures out of the sunshine, but I think I should. This polish is a little bit “dull” in the shade, so perhaps I should have pimped it with some bling.


I didn’t do any nail art on this mani, because I wasn’t quite sure what would go with this. Dots? Stripes? Stamping? Suggestions are more than welcome, because this baby is definitely a keeper! :)


Opacity: 7/10
Colour, prettiness: 7/10
Durability: 8/10
Value for money: 7/10
Overall: 7/10
Buy again: Yes

Friday, June 21, 2013

Glitter Gal ~ Teal Blue


Glitter Gal ~ Teal Blue
Blue strong linear holographic

If this isn’t your first visit here, then you probably know by now that I have a crush on holos. I’ve loved them since I laid eyes on them, and I wear them as often as the sun shines.

I’ve been meaning to try Glitter Gal’s holos for a while, and I ended up buying three of them: Crushed Ego, Lizard Belly and Teal Blue. Today I’ll show you the Teal Blue.

I used my regular base coat, and had absolutely no problems with application: No dragging or bald spots, so there’s no need to use an aqua base coat for this holo. It took two easy, fast drying coats to achieve desired opacity. When I looked at my nails first I was a bit disappointed. I mean, was this it? All that fuss for this?

But then the sun hit it, and man, can this baby shine! Two coats, no top coat:


The holo is very strong, even in low light, and the blue is absolutely gorgeous in the sunshine. Here’s another shot:


Rainbows – I just love them!


The reason I wasn’t convinced to begin with was the look of it, out of the sun. The blue is dustier than the bottle suggests, and I’m not a huge fan of dusty colours. But the colour grew on me, and after a couple of hours I actually liked it! So yes, you’re looking at a keeper!

I made a dotticure out of it. I made a line of dots diagonally across my nails with Misslyn’s #229, Party on, which is a lovely magenta shimmer, and another line of dots underneath it with Manhattan & Buffalo #05, which is a light blue/silver metallic. I sealed it all up with a layer of Depend’s topcoat, and here’s the final mani:


And a final shot:


I admit that I’m not 100% satisfied with this. I like the colour scheme, but I’d like to be a bit more creative with the dots, if that makes sense.

If you’ve got good ideas to how I make my dotties more interesting, please feel free to share it in the comments below. Thanks! ♥


Opacity: 8/10
Colour, prettiness: 7/10
Durability: 8/10
Value for money: 7/10
Overall: 7.5/10
Buy again: Yes

Thursday, June 20, 2013

Born Pretty Holo Polish #8 and #11


Born Pretty Holo Polish #8 and #11

I was thrilled when my new holos arrived. We all know that pictures can make a product much prettier than it actually is, but these polishes look really cool in real life too!

The formula is good. I used my regular base coat and the polish applies easily, and the drying time is average. I had expected it to dry really fast, but no, just average. The first coat seemed a bit sheer, but the second coat covered the nail line and smoothed all irregularities out. And man! Can these babies shine and make rainbows? I tell you what: Yes They Can!

Here’s a picture of two coats, no topcoat. The picture is taken in direct sunlight: 


Isn’t that just pretty? The rainbow effect is great!


Look at the bottles in the sunshine! I love holos like these ones.


Then I did some simple dots on it, just to show you the coverage of the polishes. I made dots with the alternate colours down each nail. The purple is the darkest of the two polishes, and it is also the most opaque of the two. But the blue one covers pretty good as well – take a look for yourself:


There’s still no topcoat on these pictures btw.


The verdict:

Pros:
Strong linear holo effect
Gorgeous colours, and there are 12 different colours to choose between
Easy application without aqua basecoat
Good coverage

Cons:
The price tag. The polish costs $12.88 for only 6ml.
Average drying time – as opposed to fast (not fair to put this as a con, is it?)