Monday, August 31, 2015

Kiko 493 ~ Vino Perlato


Kiko 493 ~ Vino Perlato
Deep red packed with shimmer

Here’s another one of the beautiful Kikos my boyfriend picked for me. This one is deep red and it’s actually the second time I’ve worn it. First time was on my toenails, and it’s definitely going to shine on my nails more than just these two times!

The formula is great, I don’t think I’ve ever experienced anything else with Kiko. Two coats is what it takes and the drying time is good.

Here’s a daylight picture:

Kiko 493 ~ Vino Perlato


The lightbox picture reveals all the beautiful shimmer.

Kiko 493 ~ Vino Perlato

I stamped on it. I tried with a stamping gradient with neon yellow and neon orange but it just didn’t work, boo! So I ended up stamping with NailNation 3000’s Black instead. The pattern is from stamping plate BP-L 005.

It ended up looking like this:

Kiko 493 ~ Vino Perlato

I love this pattern!

Kiko 493 ~ Vino Perlato


Number of coats: 2
Drying time: Really good
Finish: Lots of shimmer
Overall impression: Really good polish, I love the colour and the shimmer
Buy again: Yes

Sunday, August 30, 2015

LynBDesigns ~ Thirsty and Slay


LynBDesigns ~ Thirsty and Slay
Neon Orange and Neon Coral

I received these two beauties last time I got a package from my sweet friend in the US, Carolyn. I thought they’d look good together in a gradient.

Let me start out by showing you how it all ended up:


I started out with a layer of Thirsty. It covered surprising well for a jelly; I reckon that it’s a two coater on its own. Then I sponged both colours on in the gradient you see on the pictures. Slay is originally coral, but along with the orange background it turned into a darker and very lovely orange. I applied topcoat to make the colours come together, which they did beautifully!


The stamp is from the stamping plate BM-620 from BundleMonster. I stamped with NailNation 3000’s Black. 


The neon pretties:


I made a big mistake today. I thought I was clever – that’s often how big mistakes start, isn’t it. When I did my gradient I had masked my cuticles with liquid latex. I thought that it would be really clever to leave it on until the stamping was done, so I could remove all the access polish in one go. It was a really bad idea! I know now that it’s clever to remove the latex while the polish is still wet. If you remove it after the polish is dry, you will pull of some of the polish as well, boo!

But never mind: Now I know and I still love the final result!


Number of coats: 2 (I think)
Drying time: Good
Finish: Neon jellies
Overall impression: Cool colours!
Buy again: Yes

Saturday, August 29, 2015

Ooh La Lacquer ~ Red Red Wine


Ooh La Lacquer ~ Red Red Wine
Wine red linear holo

Today it’s time to do a red water marble! Red Red Wine from Ooh La Lacquer is a beautiful wine red linear holo and I thought it would be cool to marble with.

See how cool it looks with the wine red mixed with black and white.


It was my original plan to only marble on the ring finger and the middle finger, but I thought it looked so cool that I marbled on the rest of them as well. Red Red Wine could easily work as a one coater!


There’s one coat of the Ooh La Lacquer as the base colour to make sure that the red acted red and not pink :D This picture is taken without flash in the shadows.


I love this to bits! I think it looks seriously cool with these three colours together, and I also like that all nails have a different pattern on them.  So yes, I do feel proud of this! <3

Friday, August 28, 2015

Kiko 531 ~ Pearly Green Butterfly


Kiko 531 ~ Pearly Green Butterfly
Green packed with shimmer

I asked my boyfriend which colour I should do my nails today, and his answer was “green”. I picked a shimmery green he chose for me last time we were in Germany, and I made this mani out of it: 

I love peacocky designs like this one. But let me show you how I got there.
First I applied two layers of Kiko 531 “Pearly Green Butterfly”. It has a great formula and it dries pretty fast. Here’s a daylight picture:


Then I added a layer of glitter. I used “Cosmic” from Jordana’s Glitters collection. It’s a mix of green, blue and silver hexes along with blue microglitter. I’ve had it for a while so it deserved to get a little love today.
Here’s that step.


Then I stamped on it. I found my peacocky design on Emily de Molly’s stamping plate EdM04. I stamped with NailNation 3000’s Black and I dotted with El Corazón’s stamping polish #25 “Magnificent Century”. It’s the only one of EC’s stamping polishes I’m a bit disappointed it. It separates like crazy in NO time and it takes at least ten minutes of vigorously shaking to make it all come together again. It’s definitely not a winner for me. It is beautiful though.

A layer of topcoat completed the mani.


Green was a good choice in my opinion. What say you?


Number of coats: 2
Drying time: Really good
Finish: Lots of shimmer
Overall impression: Great polish, cool colour.
Buy again: Yes

Thursday, August 27, 2015

Too Fancy Lacquer ~ Mesmerized


Too Fancy Lacquer ~ Mesmerized
Royal purple with holo shimmer

Mesmerized is from the very first Holo Grail box from March 2014, the one that was called Meet the Makers pt. 1. Like I mentioned earlier, I only bought the two first boxes. I thought each polish ended up way too expensive.

This gem was worth every brass razoo though.

The formula is great and this is a true one coater. Drying time is good too. So yes, Mesmerized is a gem for sure.

Here’s one coat in the sun:


Isn’t it just mesmerizing? :D


I decorated my nails with some decals I bought from Aliexpress because I love Monsters University! They have some kind of white background, unfortunately it’s not always trimmed, so it leaves a pretty big piece of white space around the decal. Check out my pointer if you don’t understand what I mean. After the decals were on, I applied a layer of Out The Door’s Northern Lights, I love that topcoat with holo microglitter!


I’m pleased with this even though the decals covered a lot of the pretty polish.


How are you with decals? Is it a go or a no go? I think it can be quite a challenge to find the cool ones.


Number of coats: 1
Drying time: Good
Finish: Holo shimmer
Overall impression: I love it!
Buy again: Yes

Wednesday, August 26, 2015

Whimsical by Pam ~ Rock On


Whimsical by Pam ~ Rock On
Magenta jelly base with red, magenta and purple microglitter

This is going to be a super short post.

Rock On is from Whimsical Ideas by Pam Spring 2014 Collection, and I got it from my sweet friend Carolyn who decided to pamper me with this beauty.

Formula is good. It covers in two coats for “ordinary use” – as in if you’re not a nail polish blogger with a camera that picks up every imperfection unseen to the naked eye. I wanted my pictures to look good because the polish deserves it, so I added an extra layer. The drying time between coats is pretty good.

Here it is. Three coats and a layer of topcoat:


Isn’t it beautiful?


I was having visitors so I ran out of time = no nail art today.
I love this polish – it’s fabulous!


Number of coats: 3
Drying time: Very good
Finish: Jelly base with microglitter
Overall impression: I love the colour and the glitter
Buy again: Yes

Tuesday, August 25, 2015

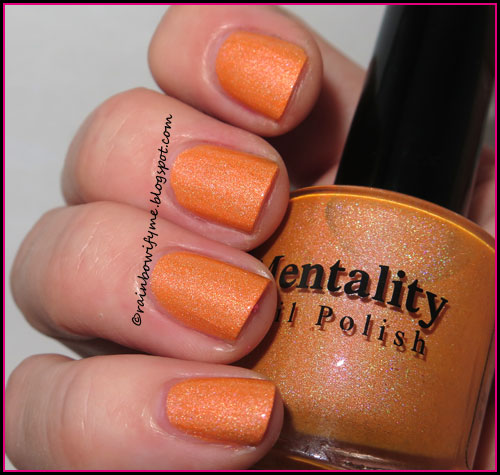
Mentality ~ Neon Orange Opague


Mentality ~ Neon Orange Opague
Neon orange

Go get your sunglasses! Today’s polish is seriously neon! It’s from Metality’s Neon Opaque collection, where the polishes are also are perfect for stamping. I wasn’t in the mood for stamping today though, so today this baby is going to shine on its own.I wasn't quite sure whether to post this or not, but this is a blog and not a market place, and fact is that I had this polish on and I blog about the polishes I try.

The polish was practically opaque after the first coat and even too, unlike the other neon opaques I’ve tried. It dries fast, and looks great.

Two coats and a layer of topcoat:


I didn’t do anything to adjust the colours, the polish looks just like this, also in lower lights.


I added some neon green studs. If my nails had been a bit longer, I might have been able to fit a fifth square stud in on my ring finger :D


I love the star studs!


I had no idea that this was going to be my favourite neon opaque. But wow, I love it!

This was my favourite of all the Mentalitys I tried and it saddened me so much to return it. But seeing how Mentality's polishes made girls' nails lift of their nail beds made me scared of using it, so I returned it. I'm just glad I got through this swatching adventure without having my nails fall off. 

Also: Big thank you to Katarina from Edgy Polish for having such a great customer service. Mentality themselves totally suck at that, so it's great to have good support from the local retailer! ♥

Number of coats: 2
Drying time: Good
Finish: Semi matte neon
Overall impression: This polish knocked my socks off!!
Buy again: No, I don't dare to

Whimsical by Pam ~ Itsy Bitsy Spider


Whimsical by Pam ~ Itsy Bitsy Spider
Purple jelly base with silver and purple glitter

Itsy Bitsy Spider is from the 2013 Hallowhimsy Collection. It’s discontinued by now but my awesome swap friend Carolyn managed to snatch it up for me! And wow, is this a great polish!

The formula is great and I used two easy coats for my manicure. The drying time between the coats is really good. If you’re a purple lover like I am, you’ll probably like this glittery shiny polish just as much as I do.

Take a look at two coats and a layer of topcoat.


Here’s a lightbox picture that lets the glitter shine through.


I stamped on it. The swirly motif is from Moyou London’s stamping plate Illusion collection-2 and I used a lilac stamping polish from Moyou (a different company than Moyou London!). A layer of topcoat completed my mani, and here it is:


I love it!


I really really like this. How about you?


Number of coats: 2
Drying time: Very good
Finish: Jelly base with glitter
Overall impression: Great purple, great polish.
Buy again: Yes

Monday, August 24, 2015

Mentality ~ Shock


Mentality ~ Shock
Neon green scattered holo

Here’s the last Mentality neon holo I’ve got. It’s neon green and a “in your face”- colour I like.

The formula is good and opacity fine. I used two coats for this mani. The drying time is good too.

No sun today, so here’s a flash picture of the beauty; it’s two coats and a layer of topcoat because the polish dries up semi matte:


I really like this colour. I’m not impressed by the holoness though. I want more of a linear holo in my holos :)


This polish is also pretty in ordinary daylight; that’s a huge plus for me.


And now I’m going to show you one of my fail manis. I wanted to simulate green flames on it, so I added white and green on my nails and dragged it upwards with a small brush. The green I’m holding is Zoya’s Giovanna.
I finished with a layer of Northern Lights from Out the Door.


The last picture is a low light picture. This doesn’t at all look as it did in my head, haha.


I hope you’ll bear with me when I show you my fails as well. This whole nail polish blogging is also a learning curve for me. 

This polish is no longer in my possesion. I sent it back after I heard about the issues with Mentality's base. I wouldn't dare to wear it again.


Number of coats: 2
Drying time: Pretty good
Finish: Semi matte muted holo
Overall impression: Not my colour at all
Buy again: Definitely not

Mentality ~ Startle


Mentality ~ Startle
Orange scattered holo

I have got to stop buying orange polishes. Half the time they disappoint me, haha!

Anyway, the formula of Startle is good and easy to work with. I used two coats for full opacity and the drying time is good. It dries up semi matte.

Here’s two coats taken with flash:


It looks quite good with the flash, don’t you think?


My problem is that this is a polish that looks way better on pictures than in real life. Startle is a good example of why we should demand to see what a polish looks like in both sun and shadow before we actually buy it. Let me turn off the flash and stick my hand into the lightbox for you and this is the result I get:


This is so not my tone of orange and I would not have bought it if there had been pictures out there that was taken in the shadows or low lights. Hmfr!
I spiced it up, because that’s how I roll. I made dots! I used a red from Essense’s Arriba!-collection called Red Corazón and Silver Holo from Urban Outfitters.

Here’s what that ended up looking like (flash picture):


That’s more like it, even though the orange is still dull outside the flashlight. 


The polishes:


I will keep mentioning that polishes should be showed in other conditions than sunlight and flash. Most of us spend more time indoors/in the shadows than in the sun.

This polish is no longer in my possesion. I sent it back after I heard about the issues with Mentality's base. I wouldn't dare to wear it again.


Number of coats: 2
Drying time: Pretty good
Finish: Semi matte muted holo
Overall impression: Not my colour at all
Buy again: Definitely not

Sunday, August 23, 2015

Mentality ~ Excite


Mentality ~ Excite
Pink scattered holo

This is the best of Mentality’s neon holos I’ve tried so far.

The formula is good and covers well; I used two coats for this mani. The drying time between the coats is good. The polish dries up semi matte, so I added a layer of topcoat before I took my photos.

Here’s two coats and a layer of topcoat taken with flash:


It’s not quite so shocking pink in the shadows, but the colour is still nice.


I played a bit with nail guide stickers and a beautiful purple from Essence called Da Vida Loca from the Arriba!-collection. A layer of topcoat completed my mani:


I really like purple and pink together, and I also like when all nails aren’t the same, like here.


How do you like this? Do you like using nail guide stickers for nail art?

This polish is no longer in my possesion. I sent it back after I heard about the issues with the base. I knew I wouldn't dare to wear it again.


Number of coats: 2
Drying time: Pretty good
Finish: Semi matte muted holo
Overall impression: The nicest one from the neon holo collection
Buy again: No

Whimsical by Pam ~ Dust Bunnies


Whimsical by Pam ~ Dust Bunnies
Silver multisized glitter and hexagons

It’s time to show you the second Whimsical by Pam polish that my dear friend Carolyn sent me.

I decided to include it in nail art. I painted my pinkie and pointer with Dust Bunnies; it takes two coats to achieve full opacity. The drying time is good. I painted my ring finger and the middle finger (and the thumb) black. I sponged the middle finger’s tip with Dust Bunnies.

Here’s the final mani:


I used a black striper on the two middle fingers and added a skull on the ring finger.


There’s also a layer of topcoat involved.


I love that skull for nail art. It’s too big to actually wear, so I took it off after taking these pictures and painted the black over with Dust Bunnies. The mani still looks really cool.


Number of coats: 2
Drying time: Pretty good
Finish: Glitter
Overall impression: Great glitter!
Buy again: Yes